
Waterproofing your bathroom is critical. You prevent costly water damage, mold growth, and structural issues. This foundational step happens before tiling. Choosing the right waterproofing materials and options for your bathroom can feel complex. We guide you through the best waterproofing for your bathroom in 2025, including bathroom waterproofing. This stops unwanted water.
Key Takeaways
Waterproofing your bathroom is very important. It stops water damage, mold, and problems with your home’s structure.
Choose the right waterproofing material for your bathroom. Think about how much it costs, what surface you are covering, and how long you want it to last.
Always follow the instructions when you waterproof your bathroom. This includes preparing surfaces, sealing corners, and letting materials dry completely.
Importance of Bathroom Waterproofing
Protecting Your Home Investment
You invest a lot in your home. Effective waterproofing your bathroom protects that investment. Think of waterproofing as an essential shield. It prevents costly water damage from leaks or spills. Without proper bathroom waterproofing, you face expensive repairs to walls, floors, and even ceilings below. This is especially true for areas like bathroom waterproofing, where water is constantly present. A good waterproofing system saves you money and hassle in the long run.
Preventing Mold and Mildew Growth
Bathrooms are naturally damp places. This warm, damp environment is perfect for mold growth and mildew. These aren’t just ugly; they pose health risks. Inhaling mold spores can lead to allergic reactions and respiratory problems, like asthma or sinusitis. You might also experience skin irritations or other respiratory conditions from prolonged exposure. A strong moisture barrier stops this harmful mold from taking hold. It keeps your bathroom air clean and healthy.
Ensuring Structural Integrity
Water can be very destructive. It can seep into your home’s structure. This happens if you lack a proper water-resistant barrier. Over time, this water infiltration weakens foundations and support structures. Cracks in the foundation allow water to seep in, compromising structural integrity. A robust waterproofing system acts as a critical barrier. It maintains the structural integrity of your home. This moisture barrier ensures your home remains strong and safe. It protects the overall waterproofing integrity of your building.
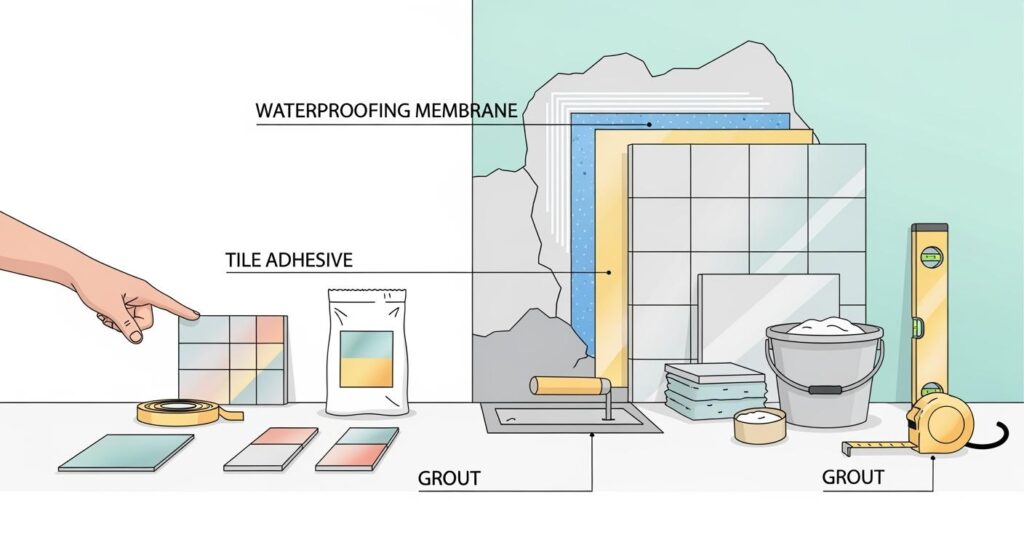
Types of Waterproofing Materials
Choosing the right waterproofing materials is crucial for your bathroom’s long-term protection. You have several excellent options, each with unique characteristics, benefits, and considerations. Let’s explore these waterproofing solutions so you can make an informed decision.
Liquid Applied Membranes
Imagine painting a seamless, protective layer onto your surfaces. That’s what liquid applied membranes offer. You apply them with a brush or roller, just like paint. As they dry, they form an elastic surface. This surface seals small gaps and cracks effectively. Because of their flexible nature, these membranes are perfect for areas with many corners or uneven surfaces. They can even follow the movement of your building structure, which helps prevent future cracks.
These membranes offer good durability, ranking second only to sheet membrane waterproofing. This is because their elastic properties accommodate building movement. You’ll find them practical and easy to apply; you don’t need heavy equipment or specialized technicians. You can even use a brush for small projects or minor renovations. Cost-wise, they fall into the mid-range, and their easy application can help reduce labor costs. You can even use them as a concrete slab treatment in basement bathrooms to stop moisture from wicking up through the concrete.
However, liquid applied membranes are less durable than sheet membranes. The final result also depends heavily on your skill or the applicator’s skill.
Sheet Membranes
Sheet membranes provide a robust waterproofing barrier. These systems come in rolls, and you install them using thin-set mortar. They are ideal for larger areas, like big basement or roof spaces.
Installing sheet membranes involves a few key steps. First, you must thoroughly clean the surface. Make sure it’s dry and free from dirt or debris. This ensures proper adhesion. Next, you apply a primer. This step is crucial for a strong bond between the membrane and the surface, whether it’s concrete or metal. Then comes the membrane application. Some membranes are torch-applied, needing heat for installation. Others are self-adhesive; you just peel and stick them. Finally, you must seal all joints and overlaps carefully to prevent any water leaks. You can also add an extra protective coating for more durability. This type of membrane creates a very effective water barrier.
Cementitious Coatings
Cementitious coatings are a popular choice for bathroom waterproofing, especially in areas like bathroom waterproofing. These materials offer good waterproofing properties and boast high attachment to surfaces. They are strong and resistant to puddles, which is a big plus in a wet environment. Many modern cementitious coatings also feature flexible cementitious technology. This flexibility helps prevent easy cracking and ensures anti-recap results, making them suitable for areas prone to micro-movements in your building.
Applying these coatings is straightforward. You typically work with two components: a powder (special cement) and a liquid (polymer emulsion). You mix these components evenly, usually in a 3:1 ratio of powder to liquid, following the manufacturer’s instructions. The application process is similar to applying general anti-leak paints; you can use a brush or roller. Before you start, make sure your bathroom floor surface is clean. For the best results, you should apply two layers, without adding any extra water. Apply the second layer after the first one is dry to the touch. For angular areas, you can strengthen the coating with a polyester mesh while the first layer of Aquagard is still wet. You complete this entire waterproofing process before you install any ceramic tiles.
Liquid Rubber Sealants
Liquid rubber sealants are a type of liquid waterproofing membrane. They are monolithic, meaning they form a single, seamless layer, and they are fully bonded to the surface. When they cure, they transform into a rubber-like, elastomeric membrane. This makes them excellent for various waterproofing applications.
The benefits of using liquid rubber sealants are clear. You get a seamless application, which is key to preventing leaks. They are also easy to apply on complex shapes and irregular surfaces, giving you great flexibility. Depending on the specific formulation, some are even UV-resistant. You can use these sealants for many areas, including roofs, terraces, balconies, and of course, bathrooms and other wet areas. They offer mold resistance, are compatible with tiling, and often have quick curing times.
However, you should be aware of some drawbacks. Certain types, like epoxy resin, cannot be used for waterproofing outer walls if they are exposed to direct sunlight (UV radiation). Always check the product specifications to ensure it suits your specific needs.
Waterproofing Sealing Mats
Waterproofing sealing mats, often known as WEDI boards, provide an incredibly effective and convenient waterproofing solution. These boards feature a closed-cell foam core, making them 100% waterproof. This means they are perfectly suited for moisture-prone areas like your bathroom or kitchen.
These mats are lightweight and easy to cut. You can use a utility knife or a fine-toothed saw to get custom installations. They also offer high thermal insulation, which can improve energy efficiency in your wet rooms. Their waterproof nature actively prevents mold and mildew growth, ensuring long-term hygiene in your bathroom. Plus, they provide a strong and durable base for your tiles. WEDI boards are versatile; you can install them on curved walls, in wet rooms, and even with underfloor heating systems. Once installed, they require very little maintenance, making them a smart long-term investment.
Installation is straightforward. First, prepare the wall surface. Make sure it’s clean, dry, and free from anything that could stop the adhesive from sticking. Then, measure and cut the WEDI board to the exact size you need. You attach the board to the wall using approved adhesives or screws for a firm hold. The next critical step is to seal all joints with a WEDI joint sealant. This ensures the waterproof integrity and stops moisture from getting through. After smoothing the surface, you can apply tiles directly onto the installed and sealed WEDI board using standard tile adhesives. These mats are highly effective for waterproofing because their 100% waterproof core means you don’t need additional waterproofing when you install and seal them correctly.
Key Factors for Choosing Bathroom Waterproofing
When you plan your bathroom renovation, selecting the right waterproofing material is a big decision. Many factors influence your choice. You need to think about your budget, the type of surface you have, and how long you want the waterproofing to last.
Budget and Installation Complexity
Your budget often guides your choices. Some waterproofing materials cost more upfront. Others might save you money on the material itself but require more complex installation. For example, liquid applied membranes are generally easier for a DIY enthusiast to apply. This can save you money on labor costs. Sheet membranes, however, often need professional installation. This increases the overall cost.
Consider the complexity of the installation process. Some systems are straightforward. You can install them yourself if you have basic DIY skills. Others demand specialized tools and expertise. If you are considering choosing the right waterproofing service, factor in the cost of hiring professionals. They ensure proper application, especially for areas like bathroom waterproofing. Improper installation can lead to costly repairs later. Sometimes, investing in professional waterproofing services upfront saves you money in the long run.
Substrate Compatibility
The surface you are waterproofing, called the substrate, plays a crucial role. Different materials bond better with certain substrates. For instance, some coatings work well on concrete. Others are designed for plasterboard or timber. You must ensure your chosen waterproofing material is compatible with your existing surface.
Always check the manufacturer’s recommendations. They specify which substrates their product works best with. Using an incompatible material can lead to poor adhesion. This compromises the effectiveness of your waterproofing. A strong bond between the waterproofing layer and the substrate is essential. It prevents moisture from seeping through.
Durability and Longevity
You want your waterproofing to last. Durability and longevity are key considerations. A high-quality waterproofing system protects your bathroom for many years. It prevents costly water damage. Different materials offer varying levels of durability.
Acrylic shower liners, for example, are known for their impressive durability and longevity. They resist dents, scratches, and warping. This comes from high-quality manufacturing. Proper installation and regular maintenance further support their extended lifespan. Compared to materials like fiberglass or vinyl, acrylic shows notable impact resistance. It absorbs forces to reduce damage. However, it is not as shatter-resistant as glass. Proper installation is crucial for structural integrity. It prevents warping, cracking, or sagging. Professional installation is often recommended. This maximizes longevity and safety.
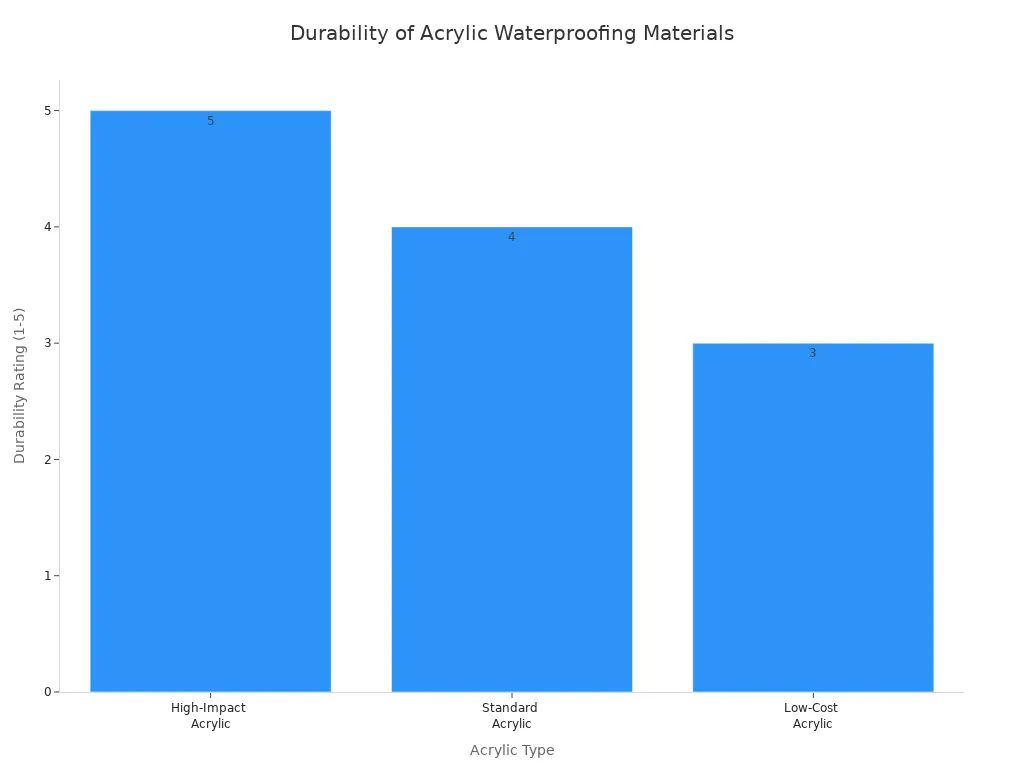
Here is a look at the durability ratings for different acrylic types:
Acrylic Type | Durability Rating (1-5, 5 being highest) | Description |
|---|---|---|
High-Impact Acrylic | 5 | Formulated with enhanced polymers for superior impact resistance, suitable for high-traffic areas. |
Standard Acrylic | 4 | A versatile option, offering a good balance of strength and affordability. |
Low-Cost Acrylic | 3 | While budget-friendly, this type may be less resistant to impact compared to others. |
You should choose a material that can withstand constant moisture exposure. It should also handle temperature fluctuations in a bathroom.
Specific Considerations for Shower Waterproofing
The shower area is the most critical part of your bathroom for waterproofing. It experiences direct and continuous water exposure. Therefore, shower waterproofing requires extra attention. You need to select a system specifically designed for this high-moisture environment.
Consider the various waterproofing for showers systems available. Each has its own advantages and disadvantages.
Installation Method | Advantages | Disadvantages |
|---|---|---|
Direct-to-wall installation | Quicker and less expensive; requires fewer specialized tools. | May not be suitable for uneven walls; can be challenging to achieve a perfect seal. |
Installation with a pre-existing frame | Easier to install on existing shower stalls; provides greater structural support. | Can be more expensive and time-consuming, especially for large showers. |
Installation with a custom-built frame | Allows for precise fit and custom design; suitable for irregular shower areas. | Most expensive and time-consuming installation method; requires professional expertise. |
Many modern shower systems offer great benefits:
They provide versatility in installation methods. This caters to diverse tastes and bathroom layouts.
They have inherent water resistance. This prevents water damage and mold growth.
You get a hygienic and long-lasting showering experience.
They create a sleek, waterproof, and often seamless surface.
They resist moisture damage, mold, and mildew. This is due to their composition of acrylic polymers, stabilizers, and pigments.
They often have relatively quick installation times.
Always ensure your chosen shower waterproofing system complies with local building codes and standards. This guarantees safety and effectiveness.
Top Waterproofing Products for Your Bathroom in 2025
Advanced Liquid Membranes and Coatings
For your bathroom, 2025 offers advanced liquid membranes and coatings. These provide excellent waterproofing solutions for your bathroom waterproofing needs. These building coatings create a strong barrier. They resist water and harsh weather. This makes your structure last longer. They also protect against mold. You can easily apply them. This is especially useful for bathroom waterproofing.
You have many choices for liquid waterproofing materials. Top options include Acrylic (fast-drying, moisture-resistant), Silicate (optimal moisture protection), Polymer (high adhesion, flexible), Epoxy (chemical-resistant, durable), and Polyurea (rapid curing, strong). For your shower floor, consider products like Aoyalis Water-Based Waterproof Agent Concentrate or Aoyalis AY-4025L Swimming Pool Waterproof Coating. These advanced membranes give you solid shower waterproofing and general waterproofing for showers. They protect your entire shower area.
High-Performance Sheet Systems
High-performance sheet systems continue to evolve. These pre-formed systems offer consistent thickness and durability. You install them in rolls, creating a robust, seamless barrier. They are excellent for large areas and provide reliable waterproofing.
Innovative Sealing Mat Solutions
Innovative sealing mat solutions, like WEDI boards, offer quick and easy installation. These lightweight, waterproof mats provide excellent insulation. They prevent mold growth and give you a strong base for tiling. You can cut them to fit any space, making them versatile for your bathroom.
Enhancing Floor Durability with BANDě Crystal Floor Hardener
To enhance your bathroom floor’s durability, consider BANDě Crystal Floor Hardener. This complementary product strengthens concrete and screed surfaces. It makes them more resistant to abrasion and impact. This ensures your floor lasts longer, protecting your overall bathroom investment.
Proper Waterproofing Application Steps
Getting your bathroom waterproofing right means following the correct steps. Don’t skip any of these crucial stages. These steps ensure your waterproofing application creates a lasting, protective barrier against water.
Essential Surface Preparation
Good preparation is key to successful waterproofing. You want your materials to stick well and last long.
First, clean all your bathroom walls and floors completely. Get rid of dust, debris, and any old residue.
Next, level any uneven or sloped areas on your floor. You want a smooth, consistent base.
Then, repair all gaps, cracks, and structural defects in your bathroom walls. Fill them properly.
Most importantly, make sure all surfaces are completely dry before you even think about starting your waterproofing application. Inspect every surface for cracks or signs of water infiltration. Scrape off loose grout and dust to ensure proper adhesion.
Sealing Critical Joints and Corners
These areas are often where leaks start, so pay close attention. For corners, use a backer rod to fill deep spots before you apply caulk. Then, smooth it out neatly. When you caulk around bathtubs and showers, apply a thin, even bead. Press it firmly against the surface. This creates a strong, waterproof seal. Remember, good caulk is flexible. It adapts to materials expanding and contracting, which stops cracks and keeps things watertight. Strong adhesion also keeps it firmly in place. Before you caulk, clean the surface thoroughly. Remove old caulk, dirt, or dust. Make sure it’s dry. Create a properly shaped groove for the caulk. Load your caulking gun, keep steady pressure, and move smoothly. Immediately smooth the bead with a wet finger or tool.
Addressing Penetrations and Drains
Pipes, shower drains, and other fixtures create openings in your waterproofing layer. You must seal these areas meticulously. Use specialized sealants and waterproofing collars around all penetrations. This ensures no water can sneak through these vulnerable spots.
Adhering to Curing Times
Don’t rush this part! Curing time allows the waterproofing material to fully dry and reach its maximum strength. For some liquid waterproofing materials, like SILCOR® 560, you need to wait 48 hours before you can flood test, tile, or add a topping. Always let your waterproofing membrane dry fully. Check the product label for specific drying times. This ensures proper curing and strength for your bathroom.
Common Waterproofing Mistakes to Avoid
Even with the best materials, mistakes during application can ruin your efforts. You must avoid these common pitfalls to ensure effective waterproofing.
Inadequate Surface Preparation
You might think skipping surface preparation saves time, but it’s a big mistake. If you don’t clean and prepare surfaces properly, your waterproofing membranes won’t stick. This leads to compromised adhesion. You face an increased risk of water penetration. This can cause potential for mold and mildew growth. It also risks structural damage to your building. Ultimately, you will face costly repairs and remediation. For example, one residential building had significant water damage just six months after waterproofing. Investigations showed that poor cleaning and priming caused the membrane to peel off. This allowed water into the subfloor and walls, requiring complete re-waterproofing and structural repairs.
Insufficient Material Coverage
Applying too little material is another common error. Insufficient material coverage directly compromises your waterproofing integrity. This significantly increases the risk of water penetrating underlying structures. Over time, this can result in severe structural damage. Furthermore, the presence of moisture creates an ideal environment for mold growth. This poses health risks and requires costly remediation. Inadequate initial application often leads to extensive and expensive repairs later on. These costs far exceed the price of proper initial application.
Ignoring Manufacturer Guidelines
Every waterproofing product comes with specific instructions. You must read and follow these guidelines carefully. They tell you about mixing ratios, application methods, and recommended temperatures. Ignoring these instructions can void warranties and lead to product failure. Proper installation depends on following these steps.
Rushing the Curing Process
Curing time is crucial for your waterproofing material to reach its full strength. You might be tempted to speed things up, but don’t. Rushing the curing process prevents the material from fully drying and bonding. This leaves your bathroom vulnerable to leaks. Always allow the recommended curing time before tiling or exposing the area to water.
Choosing the best waterproofing for your bathroom involves material type, application area, budget, and your DIY skill. Proper waterproofing your bathroom is crucial. It ensures long-term protection. Confidently select the right waterproofing product for a durable, watertight bathroom space. Remember, waterproofing your bathroom correctly prevents future issues.
FAQ
Should I hire professionals for bathroom waterproofing?
For complex projects, professional waterproofing services are a smart choice. They ensure correct application and give you peace of mind.
How often do I need to re-waterproof my shower?
You usually re-waterproof your shower during a renovation. A well-done initial job should last for many years.
What are good waterproofing solutions for my shower?
Liquid membranes offer great solutions for your shower. They are flexible and easy to apply. Consider professional waterproofing services for the best outcome.
See Also
Selecting the Ideal Flexible Waterproof Sealer for Diverse Project Needs
Optimal Wall and Floor Moisture Barriers for Your Upcoming 2025 Projects
The Ultimate 2025 Guide to Selecting Premium Anti-Slip Tile Treatments
Achieving a Mold-Free Shower: Professional Secrets for Behind-Tile Protection
A Comprehensive Guide to Top Flexible Waterproof Sealers for Homes