Key Takeaways
Choose the right repair mortar by looking at your project’s needs, the environment, and how deep the repair is. This helps your repair last a long time.
Understand mortar properties like strength, how well it sticks, and how fast it sets. Also, prepare the surface well before you apply the mortar.
Consider the cost of the mortar versus how long it will last. Sometimes, spending more on a better mortar saves money in the future because it prevents early failures.
Assess Your Repair Needs
Identify Damage Type and Severity
You must accurately diagnose the damage. This is your first crucial step. Damage can range from minor cosmetic issues to significant structural problems. Look for common signs like cracking, crumbling, receding joints, loose bricks, water stains, or natural deterioration. Moisture effects, especially freeze-thaw cycles, and poor maintenance also cause damage. You might see narrow cracks, spalling, scaling, or potholes. The depth of the repair is a critical factor here. Superficial issues might only need surface treatments, but structural problems demand more intensive solutions.
Structural vs. Cosmetic Repair
Next, differentiate between structural and cosmetic repairs. For small cracks, a simple dry cement might work as a cosmetic fix. However, for honeycombing, chipping, or spalling, you will use standard repair materials. Structural repairs are different. They require specialist mortars with specific properties. These include permeability, strength, adhesion, and corrosion resistance. The material’s strength, adhesion, shrinkage, color, and appearance must be compatible with the original concrete. For structural integrity, the repair material’s performance is paramount; appearance is secondary. Be cautious with very high early strength gains, as they can lead to shrinkage cracking and brittleness.
Evaluate Environmental Conditions
Finally, consider your application environment. Environmental factors significantly impact your chosen cementitious surface repair mortar. Relative Humidity (RH) affects cement hydration, strength growth, drying shrinkage, and chloride migration. Temperature (T) influences electrical resistivity. Electrochemical compatibility is crucial for durable concrete repair. Both RH and T directly impact this compatibility, affecting the corrosion rate. You need to select a mortar that performs well under these specific conditions to ensure the long-term integrity of your repair.
Essential Mortar Characteristics
Understanding Cementitious Surface Repair Mortar Properties
You need to understand the specific properties of cementitious surface repair mortar. Always consult product data sheets and relevant industry standards. These documents give you crucial information about material properties. For example, you will find repair mortars categorized by their application. This helps you choose the right product for your job.
Repair Mortar Categories:
Vertical & Overhead
Spray applied
Horizontal
Form & Pour
Self Leveling Underlayments
Waterproofing Mortars
These characteristics directly impact the long-term success of your repair.
Strength and Adhesion Requirements
The strength of your repair mortar is vital. You need a material that can withstand the stresses of its environment. Compressive strength is a key indicator. Many commercial cementitious repair mortars meet high standards. They often achieve the EN 1504-3 strength requirements for Class R4 materials. This means they are suitable for structural concrete repair.
Standard | Repair Class | Compressive Strength (MPa) |
|---|---|---|
EN 1504-3 | R1 (non-structural) | ≥ 10 |
EN 1504-3 | R2 (non-structural) | ≥ 15 |
EN 1504-3 | R3 (structural) | ≥ 25 |
EN 1504-3 | R4 (structural) | ≥ 45 |
ACI 546.3R | Portland-cement based materials | ≥ 20.7 (3000 psi) |
Good adhesion is also critical. The repair material must bond strongly to the existing concrete. This ensures the repair acts as one with the original structure.
Set Time and Workability
Consider the set time and workability of the repair mortar. Set time tells you how quickly the mortar hardens. Workability describes how easy it is to mix, place, and finish. For large areas, you might need a longer set time. This gives you more time to work. For quick fixes, a rapid-set option saves time.
Shrinkage Control and Durability
Shrinkage can cause cracks and reduce the durability of your repair. You want a repair mortar that minimizes shrinkage. Manufacturers use several methods to control this.
Lowering the water/cement ratio: Using less water, often with superplasticizers, helps. Too much water can cause problems like bleeding or instability.
Using curing agents: These agents trap water in the surface layer. This prevents moisture from escaping and reduces shrinkage.
Expansion additives also help. They expand during the plastic or drying phase. This offsets volume loss. For optimal volumetric stability, the expansion must happen at the right time. Some concrete designs use expansive cement technology. This offsets drying shrinkage. It can even reduce the need for steel reinforcement. You want excellent durability from your chosen material. This ensures a long-lasting repair.
Choosing Mortar by Application
When you pick a repair mortar, its intended use is super important. Different jobs need different types of mortar. Let’s look at the common applications.
Horizontal Surface Repair Mortars
You use horizontal repair mortars for flat areas like floors, pavements, and bridge decks. These mortars need to handle foot traffic and heavy loads. They also need to flow well to fill the space evenly. For these concrete applications, the mortar should meet specific standards. For example, it should conform to ASTM C 928-99a for “Packaged, Dry, Rapid Hardening Cementitious Materials for Concrete Repair,” especially classifications R1, R2 & R3 for very rapid hardening. Here are some typical performance criteria you should look for:
Vertical and Overhead Repair Mortars
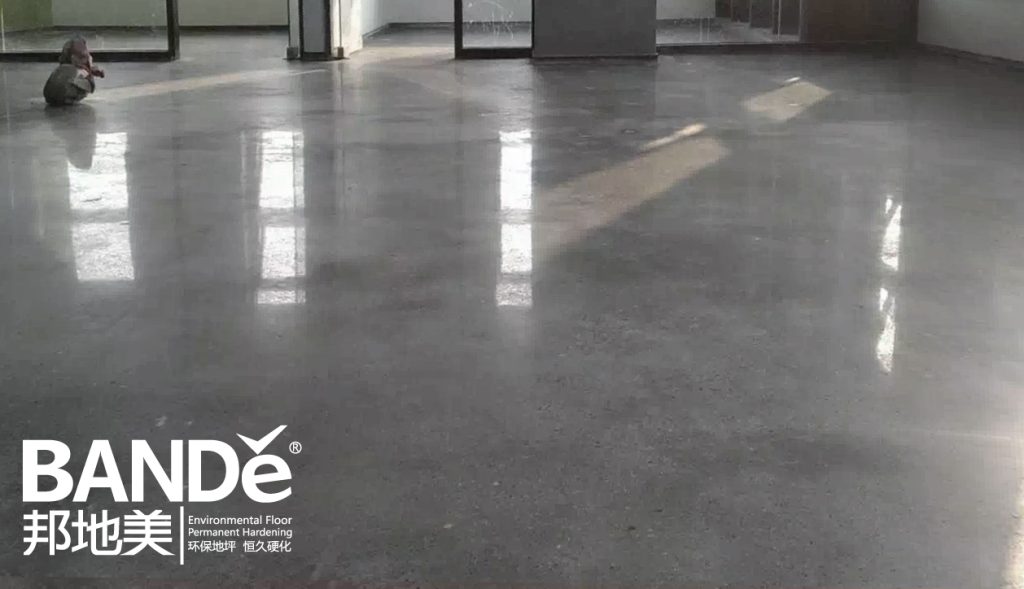
Gravity is your enemy when you work on vertical walls or overhead ceilings. You need a repair mortar that sticks and does not sag. This is where thixotropic properties come in handy. Thixotropic mortars are thick when still but become more fluid when you apply them, then stiffen up again. Products like Techfin Structural Repair Mortar, EUCO THIXO RM, and Vetorep CR520 are great examples. They offer high build-up without sagging. For demanding vertical or overhead repairs, consider a high-performance cementitious surface repair mortar like BANDě, known for its high bond strength and non-sag properties.
Rapid-Set and High-Strength Options
Sometimes, you need a quick fix or a super strong repair. Rapid-set and high-strength mortars are perfect for these situations. You might need them for:
Repairs in cold weather conditions
In-service freezer floor repairs
Applications needing high early-strength gain
Structural concrete repairs
Partial and full-depth repairs
These mortars let you get the job done fast and ensure the repair holds up under stress.
Specialized Mortars for Unique Environments
Some environments demand special mortars. For example, if you are repairing something underwater or in an area with harsh chemicals, you need specific properties. These specialized mortars might offer:
High resistance to water pressure (Water Permeability Class)
Excellent waterproofing (Waterproofing Grade)
Hydrophobic properties, making water bead and roll off
Enhanced flexural strength and compressive strength
Increased resistance to chloride ion penetration
These features ensure your repair lasts even in the toughest conditions.
Key Mortar Selection Factors
Choosing the right cementitious repair mortar involves more than just picking a strong mix. You need to consider several key factors that directly impact your repair’s success and longevity.
Substrate Compatibility and Preparation
First, think about how well your repair mortar will get along with the existing concrete. Incompatibility can cause big problems. If the repair material and the original concrete expand and shrink differently, you might see stress and delamination. This means the repair could peel away. Good adhesion is super important. It helps the repair withstand these stresses and keeps your structure strong for a long time.
You need to consider several critical factors for proper substrate compatibility:
Dimensional stability: This includes how much the material shrinks, expands with heat, creeps, and its modulus of elasticity.
Chemical properties: Look at things like alkali-silica reaction, sulfate content, pH, electrical resistivity, chloride, and corrosion caused by carbonation.
Transport properties: How easily water and other substances move through the material matters a lot.
The modulus of elasticity is especially important. It helps control how loads are shared between the two materials. If your concrete and repair mortar have very different moduli of elasticity, it can reduce the combined system’s ability to carry loads. Also, high shrinkage in cementitious repair mortars can hurt compatibility with concrete. It can even make the interface more permeable.
Proper surface preparation is just as vital as compatibility. You need to get the surface ready for the new mortar.
Decontamination: First, clean the surface. Remove dirt, oil, grease, chemicals, and curing compounds. You can use detergent scrubbing, low-pressure water cleaning, or steam cleaning.
pH Testing: After cleaning, check the concrete surface’s pH. It should normally be between 11 and 13. If it’s 10 or lower, you need more cleaning, or you might have to remove the contaminated concrete.
Surface Irregularities: Get rid of any weak or damaged concrete. Fix defects like blowholes and voids with appropriate repair materials. If you have high spots, grind them down.
Creating Surface Profiles: You need to roughen the concrete surface. This removes cement laitance, old coatings, and contaminants. You want a clean, dry, and profiled surface. Here are some common methods:
Shot Blasting: This is an industry standard. It uses abrasives propelled by centrifugal force to roughen the surface.
Grinding: Diamond pads create a surface profile, remove high spots, and get rid of coatings. You will need a dust collector.
Scarifying: Cutting tools rotate at high speeds to plane a floor. This prepares it for further treatment or removes old resin-based coatings. You should shot blast a scarified surface afterward.
Abrasive blast cleaning uses a jet of abrasive particles. It removes damaged and contaminated concrete. It also cleans mill scale, rust, and other impurities from metal. You can use various abrasives. Fine abrasives work for new surfaces. Coarse abrasives are better for old, corroded surfaces with thick coatings. For concrete, check SSPC-SP13/NACE 6 and ICRI 3012 guidelines.
Here are the steps to prepare your surface:
Remove Damaged Parts: Clear unstable fragments from metal or concrete. Use abrasive blasting to remove damaged or loose concrete and soft cement paste.
Profile the Surface: After removing unstable material, profile the surface. This helps with adhesion and strengthens the mechanical bond. Customize it for your coating and application method.
Modify the Surface’s Chemical Composition: Test the surface’s pH. You need a minimum of 9 pH. This prevents coating failure from low pH levels.
Remove Abrasive Dust: Get rid of dust and residual particles from sandblasting or grinding. Use compressed air, brushes, or solvents. This ensures bond integrity.
Rinse Chemicals Off the Surface: If you use chemicals like acid washes, rinse off any remaining contamination. This ensures proper adhesion and follows wastewater rules.
Dry the Surface: Make sure the surface is dry. Wet surfaces can cause pinholes, long drying times, or flash corrosion on metal. Some coatings work on saturated surface dry (SSD) concrete. Others need dry conditions. Fix any active water leaks and cracks on concrete.
Application Method and Tools
How you apply the repair mortar is also very important. You need the right tools and techniques for the job.
For mixing small batches, you might use a drill and paddle. For larger batches, you will need mortar mixers or transit mixers. Sometimes, you even use cement trucks.
When it comes to applying the mortar, you have several tools:
Squeegee
Straight edge
Fresno trowel
Dragbox
Asphalt emulsion sprayer
Sealcoat machine (for large jobs with squeegee application)
Hopper guns, rotor-stator, or diaphragm pump equipment (for spray application)
You can apply mortar in a few ways:
Squeegee Application: Pour the mix onto the surface. Spread it with tools like a squeegee, straight-edge, dragbox, broom, brush, or trowel. For big jobs, a sealcoat machine works well. You should pre-moisten the surface and keep it damp during application.
Spray Application: You can spray many repair mortar mixes using hopper guns, rotor-stator, or diaphragm pump equipment. This method allows for different finishes, from “orange peel” to knock-down textures.
Here’s a look at different application methods and their equipment:
Application Method | Equipment |
|---|---|
Wet Spray Process | Mechanical Mixer, Spray pump machine (worm screw or pressure plate), Air compressor, Hoses of different lengths, Nozzles |
Dry Spray Process | Rotor spray pump machine, Air compressor, Hoses of different lengths, Nozzles |
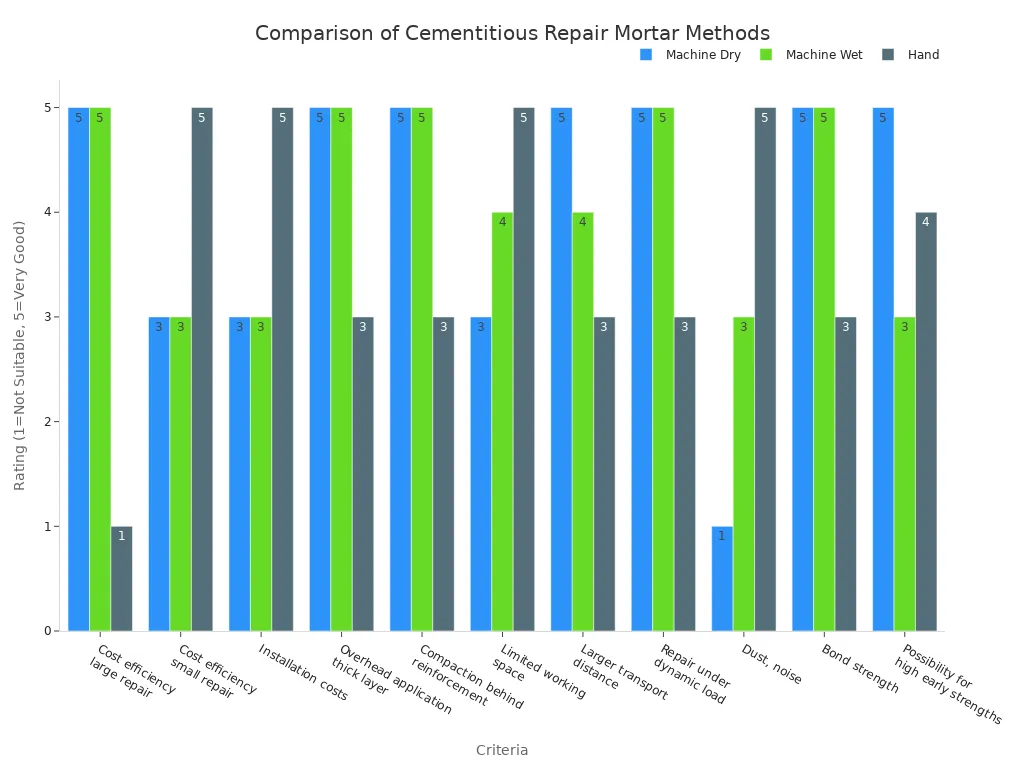
You can also compare machine application (wet or dry) with hand application:
Criteria | Machine “Dry” | Machine “Wet” | Hand |
|---|---|---|---|
Economical aspects: | |||
Cost efficiency for large repair volumes (>500 kg/day) | Very good | Very good | Not suitable |
Cost efficiency for small repair volumes (<200 kg/day) | Possible | Possible | Very good |
Installation costs | Possible | Possible | Very good |
Application aspects: | |||
Overhead application and extensive thick layer reprofiling | Very good | Very good | Possible |
Compaction behind exposed reinforcement | Very good | Very good | Possible |
Limited working space on site | Possible | Good | Very good |
Larger transport distance for material | Very good | Good | Possible |
Environmental aspects: | |||
Repair under dynamic load | Very good | Very good | Possible |
Dust, noise | Not suitable | Possible | Very good |
Technical aspects: | |||
Bond strength | Very good | Very good | Possible |
Possibility for high early strengths | Very good | Possible | Good |
Wet spray processes offer several advantages:
Better yield
Minimal rebound
Minimal site protection required
Suitable for application in confined spaces
Easy trowel finishing
Easier QC-procedures
Reduced dust generation
Mortars can also be applied by hand
Constant mortar consistency
Dry spray processes also have great benefits:
Highest output
Equipment blockages are rare
Low equipment cleaning costs
No premixing required
No grout priming required
Higher early strengths
Long feed distances are possible
Frequent stop/start sequences are easy
Thicker layers in a single operation
Temperature and Humidity Impact
Temperature and humidity play a huge role in how your repair mortar cures and performs. The temperature during mixing and afterward significantly affects the hydration process. Lower temperatures slow down hydration. Freezing conditions can even stop it. Higher temperatures speed up the reaction rate, following Arrhenius law.
Curing temperature is crucial for strength development and microstructure formation. Higher initial temperatures for Ordinary Portland Cement (OPC) accelerate hydration. This leads to more heat and a greater degree of hydration early on. However, very high temperatures, especially with internal heat from hydration, can cause durability problems. These include delayed ettringite formation and thermal shrinkage cracking. Calcium-silicate-hydrate (C-S-H) is very sensitive to curing temperature. Its density increases with curing temperature between 5 and 60 °C.
The heat of hydration varies a lot among different concrete repair materials. This is because of their unique formulas, admixtures, and cement replacement materials. This can lead to very high curing temperatures early on, especially with external heating.
For SRPC mortar, water-immersion curing at high temperatures leads to continuous strength increases. You see this at 14 and 28 days (29% and 33% respectively), after initial increases at 3 and 7 days (25% and 19%). You should not immerse OPC mortars in high temperatures after 7 days. However, you can effectively use immersion curing in high temperatures for SRPC mortars.
Cost vs. Long-Term Performance
When you choose a repair mortar, you might see a big difference in price. Premium options, like polymer-modified and epoxy-based mortars, perform much better and last longer. But they can be 5 to 7 times more expensive than standard cementitious mixes. This higher upfront cost can be a problem for projects with tight budgets. However, their longer lifespan and reduced need for future repairs make them more cost-effective in the long run.
Repairing existing infrastructure is much cheaper than replacing it entirely. Studies show it’s 60–70% less expensive. This means investing in durable repair solutions, even if they cost more initially, saves you money over time.
Studies also show that up to 25% of concrete patch repairs fail within 10 years. This happens because of issues like poor bonding or incompatible material properties. This highlights why you need to choose premium mortars. They offer better compatibility and performance. This helps you avoid early failures and the costs of re-repairing.
The EU Horizon 2020 HealCON Project showed that bacterial mortars, an advanced type of repair mortar, can heal cracks up to 0.8 mm wide on their own. This reduces lifecycle costs by 30–40%. This is a clear example of the long-term cost benefit of innovative premium options.
Premium concrete repair mortars have a high initial cost. This is due to advanced materials and production. This can limit their use in budget-sensitive projects. But these premium solutions offer exceptional durability, fast curing, and better environmental resistance. This leads to a longer lifespan for structures. Ultimately, they reduce overall lifecycle costs compared to cheaper, less durable alternatives that need more frequent repairs.
Step-by-Step Mortar Selection
Choosing the right cementitious repair mortar can feel like a big task. But you can simplify the process by following a clear, step-by-step approach. This helps you make an informed decision and ensures your project’s success.
Define Project Scope and Goals
First, you need to clearly understand what you want to achieve with your repair. Think about the big picture. What kind of damage are you fixing? What do you expect the final result to look like? Before you select any cementitious repair mortar, you must define several key elements of your project.
The type of repair: Is it a horizontal surface like a floor, or a vertical/overhead area like a wall or ceiling?
The application method: Will you trowel it on, spray it, or pour it?
The depth of the repair: Is it a shallow patch or a deep structural fix?
Answering these questions helps you narrow down your options. You need to know if you are aiming for a quick cosmetic fix or a long-lasting structural restoration.
Review Product Data and Specifications
Once you understand your project’s scope, you can start looking at product data sheets. These sheets are your best friend! They contain all the technical information about a specific mortar. You will find details about compressive strength, set time, workability, and shrinkage control. Compare these specifications with your project’s needs. For example, if you need a fast turnaround, look for mortars with rapid set times. If your repair will bear heavy loads, prioritize high compressive strength. Don’t just pick the first product you see; take the time to compare different options.
Consult Manufacturer Guidelines
Manufacturers know their products best, so always pay close attention to their guidelines. These instructions are not just suggestions; they are critical for proper application and curing. Following them helps you avoid common mistakes and ensures the mortar performs as intended.
Substrate Preparation: Make sure the substrate is Surface Saturated Dry (SSD). This means you saturate the area with water, then remove any puddles or standing water. This maintains the correct material-water-cement ratio.
Bond Coat Application: Apply a small amount of mixed mortar to the saturated area just before final placement. Scrub it thoroughly into the surface with a stiff brush. Do not add extra water or liquid to this scrub coat, as it can weaken the bond.
Mortar Installation: Install the repair mortar while the scrub coat is still moist.
Consult Product Data Sheet: Always refer to the product’s data sheet for precise instructions on mixing, required depth of installation, specific application techniques, finishing methods, and curing procedures.
Ignoring these steps can lead to poor adhesion, cracking, or premature failure of your repair.
Consider Trial Applications
For larger or more complex projects, you might want to consider a trial application. This means you test a small amount of the chosen mortar in a less visible area or on a mock-up. A trial run lets you see how the mortar handles, how it sets, and how it looks before you commit to the entire project. This is especially useful if you are working with a new product or an unusual environment. It gives you confidence in your selection and helps you fine-tune your application techniques. This small investment of time can save you a lot of headaches and rework later on.
Future of Repair Mortars
The world of cementitious repair mortars constantly evolves. You will see exciting advancements in sustainability, technology, and smart materials. These innovations promise more durable and efficient solutions for your projects.
Sustainable and Eco-Friendly Innovations
You will find a strong push towards greener options in the future. More than 40% of repair applications now use sustainable mortar blends. This shows a big shift towards eco-conscious formulations. Companies like BASF update their product lines to use non-red-listed ingredients. These new formulations act as “drop-in replacements,” giving you eco-friendly solutions without changing your work methods. You will also see nanotechnology and eco-friendly additives enhancing mechanical properties and reducing CO2 emissions. The industry focuses on low-emission products, meeting environmental regulations for VOC content and carbon footprint. Many products now carry eco-certifications like EPDs and contribute to LEED credits. Standards like UNI/PdR 88:2020 help verify recycled content, and green concrete undergoes ASTM C1157 testing for performance.
Advanced Polymer Technologies
Polymers are revolutionizing repair mortars. Polymer-modified mortar significantly improves durability. These mortars offer excellent waterproof properties, impermeability, and water retention. They also show high flexibility and better resistance to acid-based corrosion. Polymers act like ‘microfibers’ and ‘bridges,’ forming structures that boost flexural strength and toughness. They also improve bonding properties. You will find specific polymers like Styrene-butadiene rubber (SBR) and Polyacrylic ester (PAE) commonly used. Graphene oxide (GO) nanosheets are even being used to improve polymer-modified cement composites, leading to better tensile and compressive strength. Organic polymers also regulate flow, modify setting, and act as self-healing agents or corrosion inhibitors.
Smart and Self-Healing Materials
Research into smart and self-healing cementitious materials has grown a lot in the last 10-15 years. Scientists develop new formulations with better mechanical and chemical stability. They add inorganic, organic, and biological components. You will see types like geopolymers, engineered cementitious materials, and bacterial cement composites. These materials use mechanisms like autogenous healing, where unreacted cement particles or carbonization create calcium carbonate deposits in cracks. Bioconcrete, for example, uses embedded bacteria for autonomous crack repair. Crystalline admixtures also help by forming water-insoluble precipitates to block pores and cracks. These innovations mean your structures could heal themselves, leading to longer lifespans and fewer maintenance needs.
Choosing the right cementitious surface repair mortar is critical for your project’s success. You ensure longevity and restore original function. This guide helps you systematically select based on needs, characteristics, and application. Carefully evaluate your specific project requirements. Consult experts or manufacturers for tailored advice on your unique challenges.
FAQ
What is the main difference between structural and cosmetic repair mortars?
Structural mortars restore strength and load-bearing capacity. Cosmetic mortars fix appearance. You need specific properties for each job.
Why is surface preparation so important for mortar repairs?
Proper surface prep ensures strong adhesion. It prevents your repair from failing early. A clean, profiled surface is key for you. ✨
Can I use the same mortar for horizontal and overhead repairs?
No, you cannot. Horizontal mortars flow well. Overhead mortars need to stick without sagging. You must choose the right type for your project.
See Also
Achieving Durable Fixes: Your Expert Guide to Cement Crack Sealers
Selecting Top BANDě Concrete Sealers: A 2025 Buyer’s Handbook
Essential Tips for Selecting the Optimal Concrete Protective Sealer
Comparing Industrial Floor Hardeners: Your Definitive 2025 Selection Guide
Buying Guide: Concrete Densifiers, Hardeners, and Sealers Explained Thoroughly