
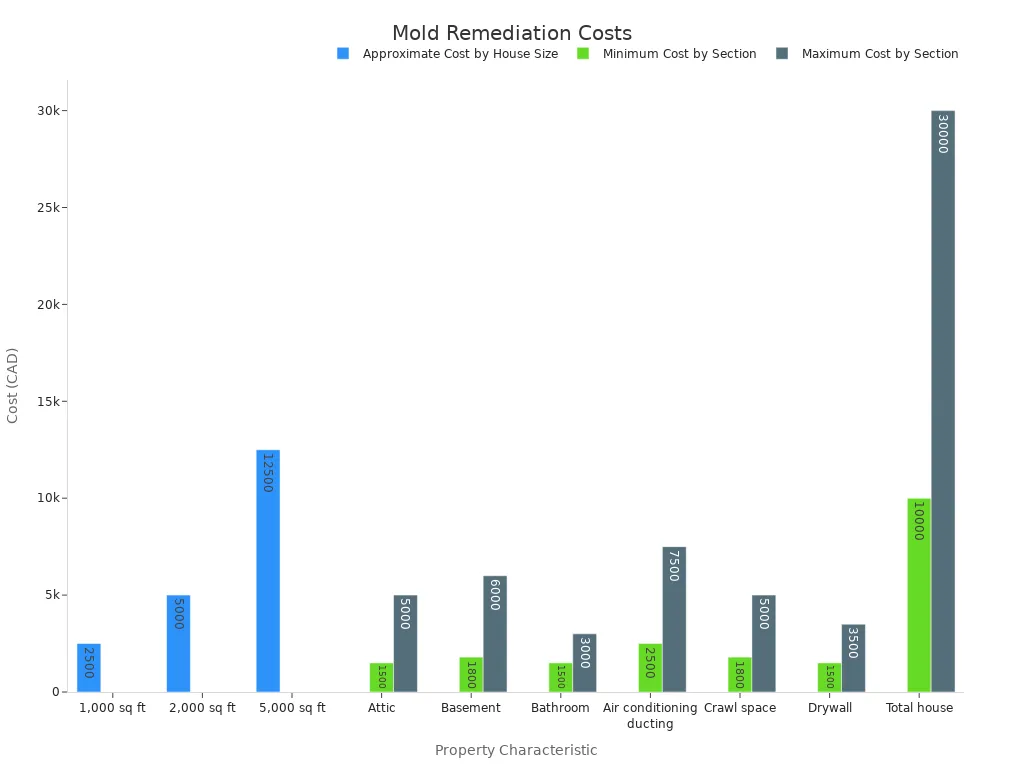
A moisture barrier is crucial for protecting your home. It stops water damage and keeps your indoor air healthy. Unchecked moisture leads to serious problems like structural decay and compromised floors. You might even face expensive mold remediation, with costs from $1,500 for small areas to over $10,000 for widespread mold.
You need to understand the difference between a moisture barrier and a vapor barrier. They have distinct functions and permeability ratings. This distinction is fundamental for proper selection. High humidity often causes many issues. We will compare various moisture barrier types for both floors and walls.
Key Takeaways
Moisture barriers stop liquid water. Vapor barriers control water vapor. Choose the right one for your project to prevent damage.
Liquid barriers are like paint. Sheet membranes are like blankets. Both protect against water, but you apply them differently.
Always prepare surfaces well. Seal all seams and openings. This makes your moisture barrier work best and protects your home.
Moisture vs. Vapor Barriers: Key Differences
Defining Moisture Barriers
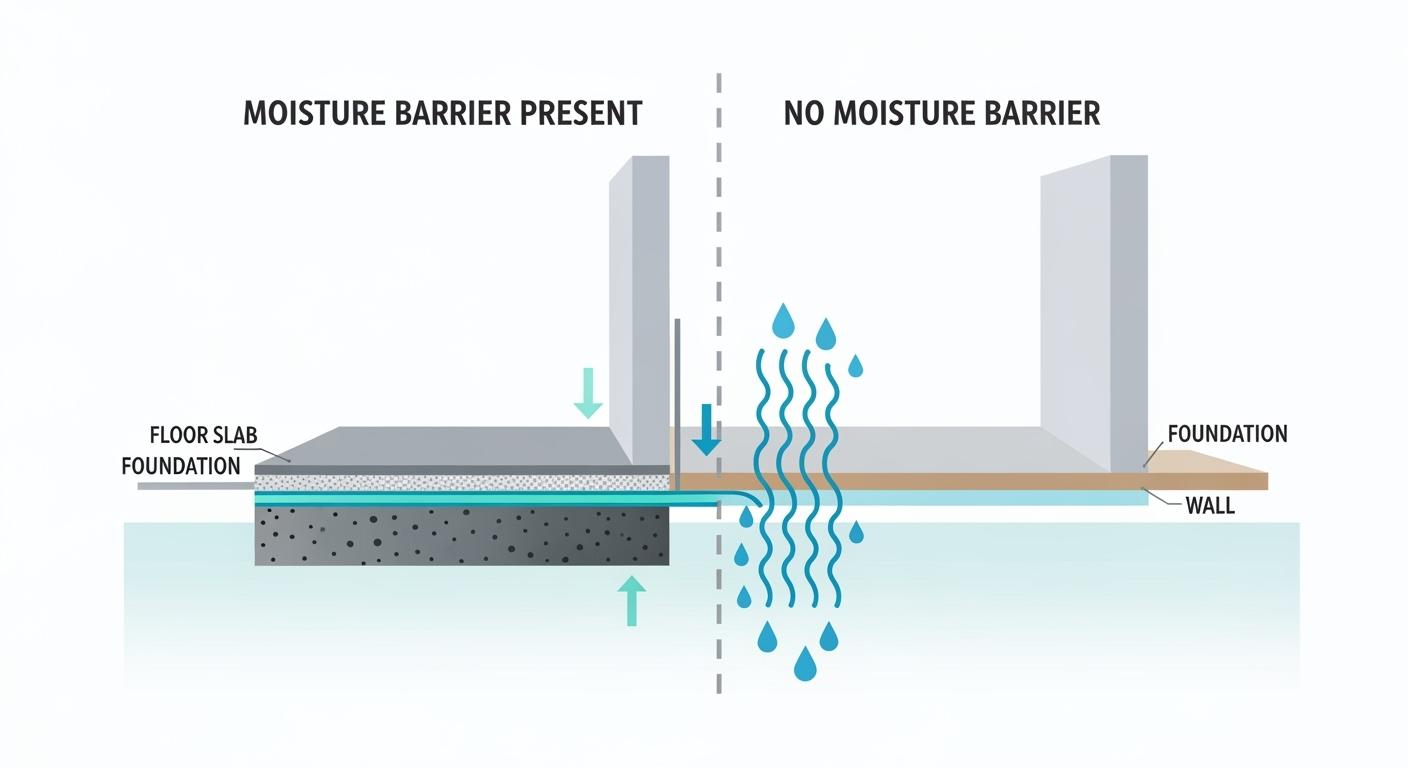
A moisture barrier primarily stops liquid water from passing through a surface. Think of it as a raincoat for your walls or floors. It creates a physical barrier that prevents water from seeping into your building materials. You often find a moisture barrier used in areas prone to direct water contact, like shower walls or under tiles on a bathroom floor. Its main job is to block bulk water, keeping your structure dry from direct splashes or leaks.
Defining Vapor Barriers
Now, let’s talk about vapor barriers. These are different because they specifically control the movement of water vapor, not liquid water. Water vapor is moisture in its gaseous form, and it can travel through many building materials that liquid water cannot. The International Residential Code categorizes these barriers based on how much water vapor they let through, using the ASTM E96 desiccant method. A true vapor barrier, often called a Class I vapor retarder, has a very low permeability, typically 0.1 perms or less. This means it’s highly effective at blocking water vapor. Materials like polyethylene sheets or sheet metal fall into this category.
Permeability Ratings and Classification
Permeability ratings tell you how easily water vapor can pass through a material. The lower the perm rating, the less water vapor can get through. The ASTM E96 / E96M standard, “Water Vapor Transmission of Materials,” measures this. Based on this, vapor retarders are classified into three main groups:
Class I vapor retarders: These are impermeable, with a permeance of 0.1 perms or less. They are the most effective at blocking water vapor.
Class II vapor retarders: These are semi-impermeable, with a permeance between 0.1 and 1.0 perms. They allow a small amount of moisture to pass.
Class III vapor retarders: These are permeable, with a permeance between 1.0 and 10 perms. They offer basic moisture control.
Why the Distinction Matters
Understanding the difference between a moisture barrier and a vapor barrier is crucial for protecting your home. If you use the wrong type, you might trap moisture inside your walls or under your floors, leading to mold growth, rot, and structural damage. For example, using a vapor barrier where a moisture barrier is needed won’t stop liquid leaks. Conversely, a moisture barrier might not adequately prevent water vapor from migrating through your walls, especially in humid climates. Choosing correctly ensures your building stays healthy and durable.
Liquid-Applied Moisture Barriers
Liquid-applied moisture barriers are like paint you roll or spray onto a surface. They form a seamless, protective layer when they dry. These barriers are great because they conform to irregular shapes and create a continuous seal, which helps prevent water from finding its way in.
Acrylic and Asphalt Emulsions
You can find liquid-applied barriers in different forms, like acrylic and asphalt emulsions. Acrylic emulsions, for example, offer excellent protection. Think about Tykote® 6161, a flexible acrylic emulsion. It gives you superior resistance to oil and grease, and it still performs well as a moisture barrier. Styrene-acrylic emulsions, like Tykote® 1019 and 6161, provide a low Moisture Vapor Transmission Rate (MVTR). This means they are really good at blocking both moisture and grease. You often see these used in packaging for frozen foods, snacks, and bakery items because they even comply with FDA regulations.
Asphalt emulsions are another type of liquid barrier. They offer strong defense against things like oil spills, gas drips, and the damage from freeze/thaw cycles. You can use them to restore the rich black look of old pavement. A gallon typically covers 75-150 square feet. These emulsions are designed to handle tough conditions, like Canadian weather and everyday wear, safeguarding asphalt pavement. They can extend pavement life by 2 to 4 years. They seal minor surface cracks, stopping water from getting in and causing damage when temperatures drop and rise. They also act as a protective barrier against oxidation from sunlight and oxygen, which prevents pavement from aging and becoming brittle. These emulsions reduce raveling by binding loose aggregate particles and reinforcing the surface. They protect the pavement structure from moisture intrusion and rejuvenate aged asphalt surfaces, giving you a waterproof layer. You often see them on older asphaltic roads and cold mix pavements, and they are also useful for concrete foundation waterproofing.
Polyurethane and Other Coatings
Polyurethane liquid coatings are another powerful option. They are highly effective in preventing leaks and keeping structures intact. These coatings form a strong, durable barrier against water.
Characteristic/Application | Description |
|---|---|
Application Process | It’s relatively straightforward, efficient, and saves time. You clean the surface, mix and apply the membrane with a brush or roller in multiple layers, then let it cure. |
Durability | It’s excellent, giving you long-lasting protection. Manufacturers rigorously test it for resistance to UV radiation, temperature changes, and physical wear and tear. |
Effectiveness | It’s highly effective in preventing leaks and maintaining roof structure integrity. It forms a strong and durable barrier against water. |
Longevity | It has a long lifespan, typically lasting 15-20 years or more. This gives you a durable waterproofing solution with minimal maintenance. |
Maintenance | You should regularly inspect and maintain it, checking for cracks or blistering, to ensure it keeps working well. |
Cost-Effectiveness | Even though the initial installation cost might be higher, its long-term durability and minimal maintenance make it a cost-effective choice. |
Typical Applications | You primarily use it for roof waterproofing. |
You can also find vapor retarder paints. These paints contain special additives that reduce the amount of water vapor that can pass through your walls, acting as a Class III vapor retarder.
Application Methods and Curing
Applying liquid barriers requires careful steps to ensure they work correctly. First, you need to prepare the surface. It must be clean, dry, and free of debris. Then, you mix the components if it’s a two-part system. For example, when applying a product like Bona R540 to concrete, you pre-saturate a roller from a paint tray. You work in sections, perhaps 4 by 10 feet, to prevent the product from setting up too quickly. You pour a puddle of the product and roll it out, covering the section. You continue this method until you seal the entire floor. If you use it as a primer, you roll it evenly with a high-quality ¼” nap roller, avoiding puddles. You let it dry to a transparent film. For a second coat as a moisture barrier over cementitious surfaces, you apply it within 24 hours.
For other products, like some Sika materials, you thoroughly stir Component A (resin) with a slow-speed drill. Then, you slowly add Component B (activator) to Component A while mixing for at least three minutes until it’s uniform. You can apply it with a trowel or brush directly to a clean, dry, and prepared surface. For thicker applications, you let the mixed material stand to build viscosity. You can also spray some products with a properly configured plural component spray system. Recoating can happen in as little as one hour, depending on curing conditions, but you must recoat soon after it’s touch dry, typically within four hours. If you miss this window, you need to heavily abrade the surface before overcoating.
Best Use Cases for Liquid Barriers
Liquid-applied barriers are incredibly versatile. You can use them in many areas where you need robust moisture protection. They are particularly effective in wet areas like bathrooms, kitchens, and basements.
Consider shower pan installations. Liquid-applied membranes are often easier to apply in these tight spaces. They are typically quick-drying, which speeds up your project. They create a continuous barrier, protecting adjacent rooms and floors from water damage. Some products even function as crack-isolation membranes, adding another layer of protection. Certain liquid-applied products exceed industry standards, offering you advanced moisture protection. You can also use them on concrete slabs before installing flooring, ensuring that moisture from the slab does not affect your new floor coverings.
Sheet Membrane Moisture Barriers
Sheet membrane moisture barriers are like giant, flexible blankets you lay down to stop water. They come in rolls and you unroll them over surfaces. These barriers create a continuous layer that blocks moisture. You often see them on concrete slabs, walls, or roofs.
Polyethylene Sheeting: A Common Plastic Vapor Barrier
Polyethylene sheeting is a very common plastic vapor barrier. You probably recognize it as a clear or black plastic film. It works great for concrete slabs and OSB panels. This material is designed to reduce moisture and water vapor penetration through the slab. It helps prevent fungus, mildew, mold, and even radon gas.
For example, Perminator underslab vapor barrier uses a polyolefin-based resin technology. You can find it in 10 mil and 15 mil thicknesses. This durable plastic vapor barrier resists cracking, puncturing, snagging, splitting, or tearing. It also resists methane gas. For concrete slab vapor barriers, a 10 mil thick clear poly vapor barrier is often recommended. This type of plastic vapor barrier impedes moisture and water vapor infiltration through concrete slabs and foundations. It offers low permeability, puncture resistance, tear resistance, and chemical resistance. It even meets standards like CAN/CGSB – 51.34-2022 and ASTME 1745.
EPDM and Modified Bitumen
EPDM (Ethylene Propylene Diene Monomer) is a durable rubber solution. You often see it on roofs. It stands up well to sunlight and most common chemicals found on roofs. A seamless rubber membrane, like EPDM, can act as a primary waterproof membrane. It offers a 0.60 permeability rating. This material is incredibly flexible, with over 1200% elongation. It resists corrosion, caustic substances, and UV rays. Its lifespan is considered indefinite when you protect it from UV exposure. You should re-apply it every 15-20 years to maintain this longevity.
Modified bitumen is another type of sheet membrane. It is an asphalt-based product, often reinforced with fiberglass or polyester. You typically install it with heat (torch-applied) or cold adhesives. It creates a robust, waterproof layer, especially popular for low-slope roofs.
Self-Adhering Membranes
Self-adhering membranes are like giant stickers for your building. You just peel off a release liner and stick them onto the surface. This makes installation easier and faster. They form a strong bond to the substrate.
For instance, IKO S.A.M.™ adhesive dries to a high tack, giving you excellent adhesion. You can use it on most substrates. This includes wood, glass mat/gypsum sheathing, masonry, concrete, and metal. Just make sure the surfaces are clean, dry, and free from dust, dirt, oil, and grease.
StoGuard® Tape is another self-adhering option. It uses spun bond polyester fabric laminated to rubberized asphalt adhesive. You can apply it to smooth surfaces. These include primed concrete, CMU, glass-mat gypsum sheathing, exterior plywood, OSB, cement board, asphalt saturated felt, and most house wraps. StoGuard® Conformable Membrane is also a self-adhered membrane flashing. You can use it on prepared vertical above-grade concrete, concrete masonry, brick masonry, wood sheathing, glass mat gypsum sheathing, and cementitious sheathing.
Installation and Seaming
Proper installation is key for sheet membrane moisture barriers to work. You need to prepare the substrate first. It must be clean, dry, and smooth. Then, you carefully unroll and position the sheets.
Seaming is especially important to create a continuous barrier. For optimal performance, you should overlap sheets by at least 6 inches. Then, meticulously seal them with acoustic sealant. This prevents moisture and air leakage. You also need to carefully cut around obstacles like electrical boxes and fixtures. Use a utility knife for this. Then, seal the edges with vapor barrier tape. This stops air currents from carrying water vapor. Avoid puncturing the vapor barrier in the middle. Only use staples along the edges when you secure it. This prevents air leakage and maintains effectiveness.
Smart vapor barriers should go on the warm side of the wall assembly. You must meticulously tape them at seams, edges, and penetrations with compatible air-sealing tape. This creates a continuous barrier. In new construction, you install the barrier over studs before drywall. Often, it integrates with a service cavity to protect against electrical or plumbing penetrations. In retrofits, you can pair it with blown-in insulation. The barrier must also connect to WRBs at window and door openings. Use fluid-applied flashings for this. This prevents air leaks. Meticulous taping and sealing are crucial, especially in wet climates, to prevent moisture infiltration at seams. This protects your floors and walls from moisture damage.
Specialized Moisture Barriers
Sometimes, you need specific solutions for unique moisture challenges. These specialized barriers offer targeted protection for different parts of your building.
Cementitious Waterproofing Slurries
Cementitious slurries are like a strong, cement-based paint you apply to surfaces. They create a rigid, waterproof layer. You often use them on concrete or masonry to stop water from getting through. They are great for areas needing robust waterproofing, like foundations or retaining walls.
Integrated Underlayments for Flooring
When you install new flooring, especially laminate, you can get underlayments with built-in moisture protection. Foam underlayment with a built-in vapor barrier works well for moisture-prone areas like basements or bathrooms. Some foam underlay products are designed specifically for concrete subfloors. You can also find reflective foil insulation, which protects against moisture. Premium options like the Warmup 4-in-1 Insulation Board include a built-in moisture barrier, perfect for concrete subfloors under your new floors.
Building Wraps for Exterior Walls
Building wraps are crucial for your home’s exterior walls. They act as a water-resistant barrier, blocking rain, snow, and wind-driven moisture. At the same time, they are breathable, allowing trapped moisture vapor to escape. This reduces condensation inside your walls. For example, Tyvek® offers high bulk water hold-out and breathability (28 to 56 perms). ZIP System® Wall Sheathing’s effectiveness depends on proper taping, with less than 1 perm. Products like TITAN® Housewrap provide premium air holdout and water resistance, exceeding ASTM E-2773 for drainage and ASTM 96A for high perm ratings. HomeGuard® Housewrap also excels at resisting air and water while letting damaging moisture vapor escape.
Solutions for Waterproofing Basements
Waterproofing basements is essential to keep them dry. For small cracks, you can use high-quality epoxy sealant or hydraulic cement. For larger issues, professionals might excavate and apply waterproof coatings or membranes to your foundation. You can also install exterior drainage systems, like French drains, to direct water away. Inside, closed-cell spray foam is ideal for basement insulation; it acts as an air seal and a vapor barrier. For floor protection, a polyethylene moisture barrier or a dimpled drainage mat on top of the concrete slab helps resist soil vapor.
BANDě’s Innovative Moisture Barrier for Concrete Slab Protection
BANDě offers an innovative moisture barrier specifically designed for concrete slab protection. This product helps prevent moisture from rising through the slab, which can damage flooring and create unhealthy conditions. It provides a reliable solution to keep your concrete slabs dry and protected.
Choosing the Right Moisture Barrier
Selecting the right moisture barrier is a big decision. It protects your building for years. You need to think about several things to make the best choice.
Climate and Environmental Factors
Your local climate plays a huge role. If you live in a place with high humidity, you face different challenges than someone in a dry area. In humid climates, water vapor constantly tries to get into your home. This means you need a vapor barrier that can handle a lot of moisture. For example, in hot, humid regions, you might need a vapor barrier on the exterior side of your wall assembly. This stops moisture from the outside air from condensing inside your walls. In cold climates, you usually put the vapor barrier on the interior side. This prevents warm, moist indoor air from condensing when it hits cold exterior surfaces. Think about how much rain or snow your area gets too. This affects how much bulk water protection you need.
Substrate Compatibility and Preparation
The surface you are applying the barrier to is called the substrate. It needs to be ready for the moisture barrier. Different barriers work best with different materials. For example, some liquid barriers stick well to concrete, while others are better for wood.
When you apply liquid moisture barriers to concrete, proper preparation is essential. You need to make sure the concrete is ready.
Diamond grinding uses special tools to clean the surface and make it rough. This helps the barrier stick better.
Shot blasting shoots steel pellets at the surface. This removes old layers and creates a textured surface for better adhesion.
High-pressure water jet profiling uses strong water streams. This cleans the surface without adding stress.
You should keep the temperature between 60-80°F. This helps the barrier cure correctly.
Use dehumidifiers to control humidity. This stops moisture from getting trapped.
Make sure the concrete has cured for at least 28 days.
Fix any uneven spots that could hold water.
Ensure the surface has a slight slope (at least 2%) for drainage.
Install expansion joints where needed.
Test the concrete to make sure it is dry enough.
Project Location: Above or Below Grade
Where you put the moisture barrier matters a lot. “Above grade” means above the ground, like your main living areas. “Below grade” means below ground, like a basement or crawl space. Below-grade areas often have more moisture issues. Water in the soil can push against foundation walls. This means you need stronger, more robust barriers for basements. You might use cementitious slurries or specialized sheet membranes. For above-grade walls, building wraps are common. They protect against rain but still let the walls breathe. For floors, you might use an integrated underlayment or a liquid-applied barrier, depending on the subfloor and potential for moisture.
Building Codes and Regulations
Building codes are rules that ensure your home is safe and sound. They often specify what type of moisture protection you need. These codes vary by location. Always check your local building codes before starting any project. They will tell you the minimum perm ratings required for vapor retarders in your area. They might also dictate specific installation methods. Following these codes is not just about legality; it ensures your home meets safety and durability standards. Ignoring them can lead to costly repairs later.
Cost-Benefit Analysis
You need to balance cost with performance. Cheaper options might save money upfront. However, they could lead to expensive moisture problems later. More expensive, high-performance barriers offer better protection and last longer. This can save you money in the long run.
Consider the typical costs for different types of barriers:
Method | Cost per sq. ft. |
|---|---|
Liquid Membrane | $5 – $10 |
Sheet Membrane | $3 – $7 |
While liquid membranes might seem more expensive per square foot, their seamless application and durability can offer great value. Sheet membranes are often more budget-friendly. Think about the lifespan of the product and how much maintenance it needs. A durable solution with minimal upkeep often provides the best overall value.
Moisture Barrier Installation Best Practices
Substrate Preparation Essentials
Before you even think about applying a moisture barrier, you must prepare the surface. This step is crucial for success. Make sure the substrate is clean, dry, and smooth. Remove all dirt, dust, grease, and loose debris. For wood subfloors, they must be dry and well secured. Their moisture content should stay under 12%. If you have hardwood flooring, the moisture content difference between the flooring and the subfloor should not exceed 4%. Proper preparation ensures your barrier sticks well and performs its job.
Proper Application Techniques
Applying your moisture barrier correctly makes all the difference. If you use a liquid-applied barrier, follow the manufacturer’s instructions carefully. You often roll or spray these on, creating an even coat. For sheet membranes, unroll them smoothly, avoiding wrinkles or bubbles. When you are installing a vapor barrier, always ensure you have good ventilation. This helps with curing and reduces indoor humidity.
Sealing Joints and Penetrations
Sealing is where many installations fail. You need to create a continuous, unbroken shield against moisture.
Overlap seams of polyethylene sheets by at least 12 inches.
Seal all seams securely with appropriate adhesive tape to ensure no gaps.
Pay close attention to sealing around openings such as pipes and electrical boxes to prevent moisture entry.
Ensure all edges of the vapor barrier are sealed to maintain integrity and prevent moisture transfer. This meticulous sealing prevents moisture from sneaking through tiny gaps.
Common Installation Mistakes
Many people rush the preparation phase. They might not clean the surface enough or check for proper moisture levels. Another common mistake is not sealing seams and penetrations thoroughly. Gaps, even small ones, can let moisture bypass your barrier. Also, choosing the wrong type of barrier for your specific project can lead to problems later.
Testing and Inspection
After installation, you should always inspect your work. Look for any areas you might have missed or any damage to the barrier. For some applications, you can perform simple tests, like a moisture meter reading, to confirm the substrate remains dry. This final check gives you peace of mind.
You now understand how crucial selecting and installing the correct moisture barrier is for your building’s health and longevity. We covered liquid-applied, sheet membranes, and specialized solutions, each with unique benefits for your walls and floors. Make informed decisions, considering your project, climate, and local codes. Prioritize moisture protection; it’s a fundamental investment that truly pays off long-term.
FAQ
What is the main difference between a moisture barrier and a vapor barrier?
A moisture barrier stops liquid water. A vapor barrier controls water vapor. You use them for different types of water protection.
Can I install a moisture barrier myself?
Yes, you can. However, proper preparation and careful application are crucial. Always follow the manufacturer’s instructions closely for the best results.
Where should I use a liquid-applied moisture barrier?
You should use them in wet areas like bathrooms, kitchens, and basements. They are also great under new floors on concrete slabs.
See Also
Your Home’s Essential Guide to Wall and Floor Moisture Barriers
Understanding Wall and Floor Moisture Barriers: Why They Are Crucial
Comparing Industrial Floor Hardeners: Your Comprehensive Guide for 2025
Buying Guide: Concrete Densifiers, Hardeners, and Sealers for Your Project
Achieving Flawless Waterproof Coating Application Across Diverse Surfaces