
You appreciate the classic aesthetic of Victorian design, yet blending this traditional style with modern durability can be a challenge. A successful Victorian bathroom renovation demands meticulous planning. You’re aiming for a beautiful, fully waterproof bathroom that captures that authentic old-world charm. Selecting the right materials for Victorian bathrooms is crucial; they not only enhance the visual appeal but also ensure effective resistance against moisture and mould.
Key Takeaways
Think about your Victorian bathroom. Pick old-style things. These include baths that stand alone. Also, choose toilets that are high up. Use tiles made of porcelain. This makes it look real.
Stopping water is very key. Get surfaces ready. Use new waterproofing stuff. This stops water from causing harm. It makes your bathroom last.
Mix old looks with new safety. Put waterproofing behind old walls. Do the same for floors. Hide new pipes. This keeps the old charm. It also keeps your bathroom safe from water.
Planning Your Authentic Victorian Bathroom Renovation
You are starting a victorian bathroom renovation. This part helps you with early design ideas. You want to get the real victorian feel. Think about tall ceilings. Think about natural light. Also, think about lots of space. These are basic design rules. They help you get the look you want.
Key Elements of Victorian Style Bathrooms
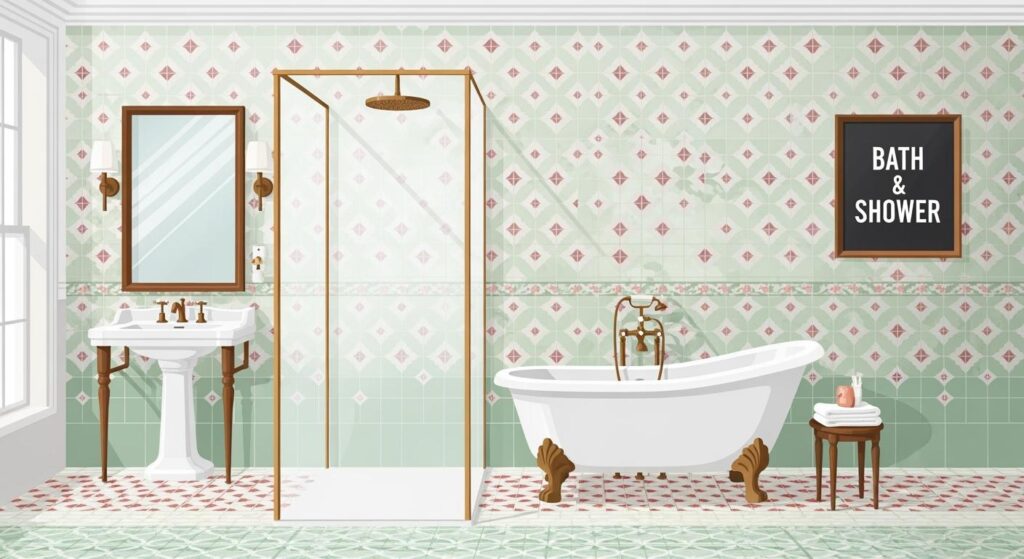
Victorian bathrooms look very nice. They focus on beauty. They also focus on grandeur and comfort. This is different from modern, simple styles. You will see fancy and rich fixtures. Key parts include freestanding baths. Ornate taps are also important. Special victorian colours and tiles matter too. Fixtures in victorian style bathrooms are elegant. They are also sophisticated and timeless. They have charm. Vanity units often have old-style wood. Classic panel details go with rich ceramic basins. Baths are usually comfy. They have curved roll-top or freestanding shapes. Traditional bath shower mixer taps make them better. Toilets are often close to the wall. More often, high-level toilets are used. These have cisterns high up. They have pull chains to flush. Lower options are also available. Taps are traditional and fancy. They come in many styles. These include pillar taps. Mixer taps and bath fillers are also common. You often see them in chrome. Or they are brushed copper or gold. Do not use sleek modern designs.
The 18th and 19th centuries saw big changes. Plumbing and cleaning got better. This meant more indoor plumbing. Bathrooms changed from simple rooms. They became fancier and more useful. Popular items included clawfoot tubs. Pedestal sinks and high-tank toilets were also popular. These often had fancy decorations. The Victorian Era was a ‘golden age’ for bathroom design. It showed off richness. It had fancy insides. It also showed cleanliness and good health. Bathrooms became a sign of wealth. Important design parts included fancy fixtures. Intricate tilework was also key. Rich comforts were common. Porcelain fixtures were used. These included pedestal sinks and freestanding tubs. Fancy wallpaper was popular. Rich fabrics and fancy lights were also common.
Iconic Fixtures for a Traditional Victorian Bathroom
You want to make a traditional victorian bathroom. The famous cast iron bath is a ‘hero piece’. It is usually a big freestanding tub. It has elegant roll-top designs. It also has claw feet. This bath is the main part of old-style bathroom design. High-level cisterns with pull chains are best for toilets. Pedestal basins with fancy details fit a victorian bathroom renovation well. The famous freestanding bathtub was a main item. It was often made of cast iron or tin. It showed luxury in victorian bathrooms. It was the heart of their elegance.
Freestanding bath choices are very important. They complete victorian style bathrooms ideas. They add glamour. They make a space look like an iconic victorian-era bathroom. High-level toilets are a clear and special feature. They have a cistern high on the wall. A flush pipe connects it to the toilet. A pull chain makes it work. This design shows timeless class. It also shows victorian art. Key parts of traditional victorian style bathrooms include freestanding baths. High-level toilets and pedestal basins are also key. The freestanding bath is the main part. It is a very important item. It often is the main focus of the room.
Think about the usual sizes for these items.
Basins: H 840 x W 560 x D 470 (mm) or H 840 x W 610 x D 510 (mm). A Regal Pedestal Option adds 60mm to the height.
WC Dimensions: 470mm (W) x 730mm (D) x 820mm (H).
Basin Dimensions: 590mm (W) x 490mm (D) x 900mm (H) (includes full pedestal).
Here is a chart. It shows the width of some traditional bathroom furniture options:
Period-Accurate Material Choices
You need to pick materials from that time. These choices make it look real. They also make it last.
Material | Water Resistance | Maintenance | Durability | Authenticity |
|---|---|---|---|---|
Porcelain | Excellent | Very Low | Excellent | Good |
Ceramic | Very Good | Low | Very Good | Excellent |
Encaustic Cement | Good (when sealed) | Moderate | Good | Excellent |
Natural Stone | Moderate (when sealed) | High | Good | Good |
Porcelain Tiles are made from thick clay. They are baked at high heat. This makes them very hard. They do not let water in. They last a long time. They do not let water in. They resist stains. They resist scratches. They do not need sealing. You can get non-slip options. They look old but work like new. Ceramic Tiles are great for victorian bathroom floors. They are often made harder to stop water. They feel truly old. They have a traditional dull finish. They last well for homes. You can find them in fancy patterns. Many are made in the UK. They feel truly from that time.
Encaustic Cement Tiles are real victorian craft. These are handmade cement tiles. They were popular in victorian times. They look truly old. Their colours are very deep. They feel nice, cool, and solid underfoot. They have a natural dull finish. They get a nice old look over time. They need proper sealing. They also need sealing again sometimes. Natural Stone and Marble Mosaics were used in victorian design. This includes marble parts. Design choices include basket-weave patterns. Hexagonal marble mosaics were used. Carrara marble with black dots was also used. They need sealing. Smooth finishes are best to prevent slips. These are great choices for ornate, patterned floor tiles.
For copies that look old, use the same type of wood. Or choose wood that lasts as long. This is key for keeping it safe. It makes sure all parts age the same. Modern fixes with wrong wood can cause problems. It can also lead to mould or water damage. It ages unevenly. This makes fixes look bad. Or it damages the old item. Experts often use old wood from the same time. Or they match good wood. They use a finish that looks old. They carefully line up the wood grain. This makes it look good. It also makes it strong. New science gives us materials. These can look and feel like old ones. Rubber moulding makes copies. These look just like the real thing. You can get an old look. It will also last a long time.
Colour Palettes and Decorative Touches
You can pick from many colour sets. Traditional victorian styles liked deep, rich colours. These include burgundy. Forest green and navy blue were also popular. Lighter colours often went with them. These include dusty rose. Sage green and lavender were also used. Metal accents were added. These were gold or brass. Tiles and flooring were common choices. These included hexagonal, octagonal, and square tiles. They were often black and white. Or they had fancy colourful patterns. Mosaic tiles made detailed designs. This included flower shapes. Floors often had borders that stood out. Wall tiles often had fancy borders. Or they had friezes. These had raised patterns.
Walls and panels in victorian bathrooms often had colourful wallpaper. It looked like murals. This included flock and damask patterns. Big flower and leaf prints were also common. Wall panelling was also common. Wainscoting and board & batten were used. Tiles and flooring had bold and rich designs. Checkerboard tiles were popular. Parquet and herringbone floors were common. Wall tiles often included simple vertical or metro tiles. These came in colours like green. White or dark blue were also used. They often had shiny finishes. Walls half-tiled with matching trims were also typical. This makes a truly decorated and vintage bathroom design. You can pick a statement bathtub. This will complete the decor.
Mastering Modern Waterproofing for Longevity
You must know about waterproofing. This is very important for any bathroom. It is key for a traditional one. Good waterproofing stops damp. It stops damage in wet areas. These areas include showers. They include areas around baths. They also include behind basins. You need to know UK building rules.
Understanding Waterproofing Standards
You need to know UK rules for bathroom waterproofing. These rules make your bathroom last. Magnesium oxide boards are not allowed. You cannot use them for tiles. For wet rooms, use special boards. Use them for bathrooms with power showers. These boards need good approvals. All waterproofing systems need special certificates. These certificates must be accepted by NHBC. They must work with your tiles. They must work with your glue and grout.
The British Standards Institute has rules. These rules are for waterproofing. BS 5385-1 is about wall and floor tiles. This is for normal inside use. New rules say to waterproof all surfaces. Do this before tiling. From January 1, 2025, new rules apply. All NHBC homes must follow them. This is for homes where work starts then. Better waterproofing is now a must. This is for bath and shower areas. It is for wet rooms and bathroom pods. All walls and floors in these areas need cover. Use a special liquid cover behind tiles. This stops water getting in. Only use products NHBC accepts. These products must make walls and floors watertight.
Substrate Preparation for Durability
Good surface preparation is key. It helps waterproofing stick well. It makes it last long. Always check the surface first.
Assess the Substrate Condition: Look for cracks. Look for rough spots. Look for uneven areas. Look for dirt. Use a moisture meter. Or use a tape test. Check for water. This is key on concrete. Too much water stops glue from sticking. The surface must be dry. Or treat it with a special liquid. Fix cracks with the right fillers.
Clean and Prime the Surface: Remove dust. Remove grease. Remove oil. Remove loose bits. Use the right cleaners. Pick a primer for your surface. This could be concrete. It could be metal or wood. Special primers give strength. Other primers work for rough surfaces.
Ensure Proper Slope and Drainage: Make sure areas have a slope. This is for balconies and bathrooms. It should be 1–2%. This sends water to drains. It stops water pooling. Pooling can harm waterproofing.
Cure and Dry: Let most systems dry for 24 to 48 hours. Weather can change drying time. High dampness or cold can slow it. Too much heat can make it dry unevenly. Always follow product instructions. Make sure the area is not disturbed.
You need to fix any surface problems.
Defect | Method | Tool |
|---|---|---|
Holes/voids | Clean out dust and dirt. Remove loose stones. Fill back to original shape. Use special grout or mix. | Brush, broom, or vacuum cleaner. |
Cracks (non-structural) | Make “V” shape at least 25 mm deep. Remove loose bits. Fill back to original shape. Use special grout or plaster. | Hammer and chisel or machine. Drill and mixer for fillers. |
Honeycomb areas | Chip back to strong concrete. Fill back to original shape. Use special grout or plaster. | Hammer and chisel or machine. Drill and mixer for fillers. |
Rough surfaces | Grind to make smoother. Put on sand/cement layer. Put on recommended plaster layer. | Electric grinder or concrete grinder. Steel float and wood float for layers. |
Sharp protrusions | Grind them off. | Electric grinder. |
Sharp external corners | Grind them to a smooth curve. | Electric grinder. |
Dirt/oil grease loose plaster etc. | Clean with a strong water jet. | High-pressure water jet. |
Internal corners and around penetrations | Apply sand/cement curve. Or use as maker says. Or add extra support. | Special trowels for mixing. Special trowels for curves. |
Brick surfaces | Point the gaps well. Apply cement render. Do this to the right height. | N/A |
You must clean all concrete surfaces. They must be free from flakes. They must be free from dust. They must be free from mould. They must be free from oils. They must be free from wax. They must be free from anything that stops sticking. You can clean surfaces with machines. This includes air. It includes sweeping. It includes rubbing. It includes strong water jets. You can also use chemicals. Grind down any rough surfaces. This makes a smooth surface. It helps the waterproofing stick well. Remove surface problems. Use tools that will not harm other areas. Use suitable materials. Use special mortar. A bonding agent helps it stick. Let the fixed area dry for 24 hours.
Modern waterproofing works very well. It protects the surface. These new products often do not need primers. They are ready to use. They do not need water. They do not need thinners. This is good for you. It is good for the environment. This way saves materials. It makes fitting faster. It makes cleaning easier. These liquid waterproofing products work in tough conditions. This includes high dampness. It includes water. It includes very cold or hot. They can handle sudden temperature changes. They also dry quickly. You can put them on concrete. You can put them on screed. This is even if they are not fully dry. They stop water. This is even with constant dampness. When preparing roof surfaces, check for problems. These include chimneys. These include joints. These include drains. Also, look for unevenness. Look for damage to old covers. Liquid waterproofing fixes these problems. They stick easily. They reach even hidden corners.
Advanced Waterproofing Membranes: BANDě Rigid Agent
You have types of advanced waterproofing for your bathroom.
Sheet Membranes: These are strong. They are waterproof. They are made from special plastic. You stick them to the surface. They make a full barrier.
Liquid Membranes: These are waterproof coatings. You put them on with a roller. You can use a brush or sprayer. They make a smooth, stretchy barrier when dry.
Foam Boards: These are made from special foam. They come with a waterproof layer. They give both warmth and waterproofing.
Other choices include cement waterproofing. This makes a strong barrier. It stops dampness for concrete. Liquid covers coat concrete. This gives a smooth finish. You can also find cement-based systems. These are two-part. You brush them on. Polyurethane liquid covers are also available. Acrylic resin waterproofing materials are too.
Grout and Sealants: The Final Barrier
Grout and sealants are the last barrier. They stop water. You need the right types for wet areas.
Grout Types for Wet Areas:
Epoxy Grout: This is stronger. It stops water better than normal grout. It stops stains well. It stops chemicals well. It is a great choice for wet areas like showers.
Sealant Types for Wet Areas:
Penetrating Sealers (specifically clear silicone sealer): These go into the grout. They protect without changing how it looks. A clear silicone sealer is best for most homes. It works well. It is easy to use.
Types to Avoid in Wet Areas:
Non-penetrating sealers: These make a visible layer. It sits on top of the grout. Do not use them for wet areas. The layer can stop water from leaving. This can cause mould.
Grout sealant usually lasts a while. It needs new sealant every 12 to 18 months. Busy areas, like family bathrooms, need it sooner. This is because of constant use. It is because of spills. It is because of frequent cleaning. Less busy areas, like guest bathrooms, may last longer. The type of sealant changes how often. Sealants that go into the grout usually last longer. This is compared to surface sealants. Water-based sealants may need more often. This is compared to solvent-based ones. How you look after it changes how long it lasts. Use gentle cleaners. Do not use harsh chemicals. This helps the sealant last. Clean regularly with safe products. Clean up spills quickly. Do not let too much water stay. These things help sealant last longer. You can do a water test. This shows if you need new sealant. If water forms drops, it is fine. If it soaks in, you need to put more on. New sealant is usually needed every 1 to 2 years. This is true in busy or wet areas. A quick water drop test can tell you. It tells you if it is time to reseal.
Essential Ventilation for Preservation
Good air flow is key. It keeps your traditional Victorian bathroom good. It stops mould and damp. All bathrooms must have air flow to the outside. This can be a window. It can be a fan that turns on and off. Or it can be a fan that runs all the time. For rooms with a shower or bath, the fan must move 15 litres per second. This is for fans that turn on and off. For fans that run all the time, it is 8 litres per second. Rooms with only a toilet need less. This is 6 litres per second. This is for both types of fans. You should put fans high up. They should be no more than 400mm below the ceiling. The needed area for air vents is 4,000mm² EA.
Any new bathroom should have air flow. This stops dampness. It removes smells. For toilets only, an open window can work. This is if it is safe. If you update a bathroom, keep the fan. Or replace it. If there is no fan, you do not have to put one in. But you can. Air flow for the whole building needs 4,000 mm² area. This is for a bathroom.
Extractor fans are common. They work well. They take damp air from the bathroom. They send it outside. Or they send it into a special pipe. Things to think about are fan power. Think about how loud it is. Think about timers. Think about dampness sensors. Opening windows helps. Even a little bit. It helps push out damp air. Small vents in new windows give constant air flow. But windows alone may not be enough. This is true in some weather. It is true for some bathroom layouts. Special systems bring in fresh air. This lowers dampness in the whole home. This includes the bathroom. You often use them with extractor fans. This is for very damp areas. Passive air vents let air flow. They use grilles in ceilings or walls. They are not as good without a fan. They need good air flow through the room.
Mixing Old Style with Waterproofing
You want to mix new waterproofing with an old look. This part gives you good tips. You can use new waterproofing. It will not lose the old charm.
Waterproofing Behind Old Wall Styles
You must put in waterproofing first. Do this before adding pretty things. These include dado rails. They include wood panels or metro tiles. Put a full waterproof layer on the walls first. This makes a strong wall against water. It stops water from getting into the wall. Then, put your old-style wall finishes over this safe wall. This keeps the victorian design nice. It also keeps it safe for a long time.
Keeping Old-Style Floors Safe
Keeping your old-style floor safe needs good plans. You need to get the floor ready. Make floor joists stronger if needed. Make a slope towards the drain. This stops water from sitting. For concrete floors, use a Damp Proof Membrane. This stops water from the ground. Before tiling, put a waterproof layer on all parts. This is called tanking. For small tiles, use them for wet room floors. Their many lines stop slips well. They also make a slope for water. Use special grout for wet room floor tiles. This makes it fully waterproof.
New Showers in an Old Setting
You can put new showers in your victorian bathroom. Use smart planning. Pick good shower heads and controls. You can put a glass screen in a corner. This makes a separate shower area. Or, use a shower curtain. Use a rain shower with a roll-top bath. This keeps the old look. It also gives new comfort.
Hiding Pipes for a Perfect Look
Hiding new pipes is key. It makes a perfect old victorian look. Pedestal basins are great for this. Their old design hides pipes well. You can also pick a basin on the wall. Add a shiny chrome pipe for an old feel. Hidden pipes look neat. They make more space. They also last longer. This is because parts are safe from water. This makes your bathroom easier to clean. It also makes less noise.
You can have a lovely Victorian bathroom renovation. It will last a long time. Mix old charm with new waterproofing. Plan carefully. Use things from the past. Use new methods. BANDě Rigid Waterproofing Agent is one. You will get a beautiful traditional victorian bathroom. It will be worry-free. Enjoy your victorian sanctuary. It will last forever. This makes sure your victorian style bathrooms stay nice.
FAQ
How do you waterproof behind traditional wall finishes?
You apply a full waterproof layer to the walls first. Then, you install your dado rails or wood panels over this protected surface. This keeps your walls safe.
What is the most important part of waterproofing?
Good substrate preparation is crucial. You must ensure surfaces are clean, dry, and smooth. This helps waterproofing materials stick well and last long.
Can you use modern fixtures in a Victorian bathroom?
Yes, you can. You should choose fixtures that blend with the Victorian style. For example, a rain shower with a roll-top bath works well.
See Also
Mastering Concrete Waterproofing: A Comprehensive Guide to Effective Techniques
DIY Basement Protection: Preparing Your Home for Flood Season Effectively
Protecting Your Home: Essential Wall and Floor Moisture Barrier Solutions
Choosing the Ideal Flexible Waterproof Sealer for Diverse Projects
Top Flexible Waterproof Sealers: A Homeowner’s Guide to Selection