
Living by the coast brings unique beauty, but your coastal properties face a relentless salt spray challenge. This isn’t just about looks; you must preserve structural integrity and property value. This guide provides effective concrete protection coastal areas strategies for 2025. We help you understand the threat and choose the optimal sealer. Proactive protection safeguards your investment.
Key Takeaways
Salt spray damages coastal concrete by causing rebar to rust and concrete to crack; early detection of signs like efflorescence and rust stains is important.
Sealing concrete creates a protective barrier against salt and moisture, extending the life of your property and reducing maintenance costs.
Choose penetrating sealers for coastal areas; proper surface preparation and regular maintenance are essential for the sealer to work well.
Understanding Salt Spray Damage to Coastal Concrete
Living near the sea exposes your concrete and masonry to constant attack from salt spray. This isn’t just a minor issue; it’s a significant factor in coastal erosion processes that can severely compromise your property’s integrity. You need to understand how this damage occurs to protect your investment effectively.
Chloride Ingress and Rebar Corrosion
When salt spray hits your concrete, chloride ions from the salt penetrate the porous surface. Think of concrete as a sponge, slowly absorbing these tiny, corrosive particles. Once inside, these chlorides reach the steel reinforcement bars (rebar) embedded within your concrete. This triggers a chemical reaction, causing the rebar to corrode and rust. As the rebar rusts, it expands, exerting immense pressure on the surrounding concrete. This internal pressure leads to visible damage like spalling (where pieces of concrete break off) and cracking. You will see your once-solid structures begin to crumble, a clear sign of the relentless coastal site risks you face.
Recognising Signs of Salt Damage
Spotting salt damage early is crucial for effective risk management. You can look for several visible indicators. Initially, you might notice slight discolouration or dampness on walls. A common early sign is efflorescence, a white, powdery residue that appears on the surface as moisture evaporates, leaving salt deposits behind. As the damage progresses, you will see more severe signs. Look out for reddish-brown rust stains on the concrete surface, which directly indicate corroding rebar underneath. You might also observe fine cracks forming in a grid-like pattern, or the concrete surface could appear to bubble or blister. Eventually, pieces of concrete will flake or chip away, a process known as spalling. Dark spots or unusual stains can also signal underlying issues.
Why Sealing is Essential for Concrete Protection in Coastal Areas
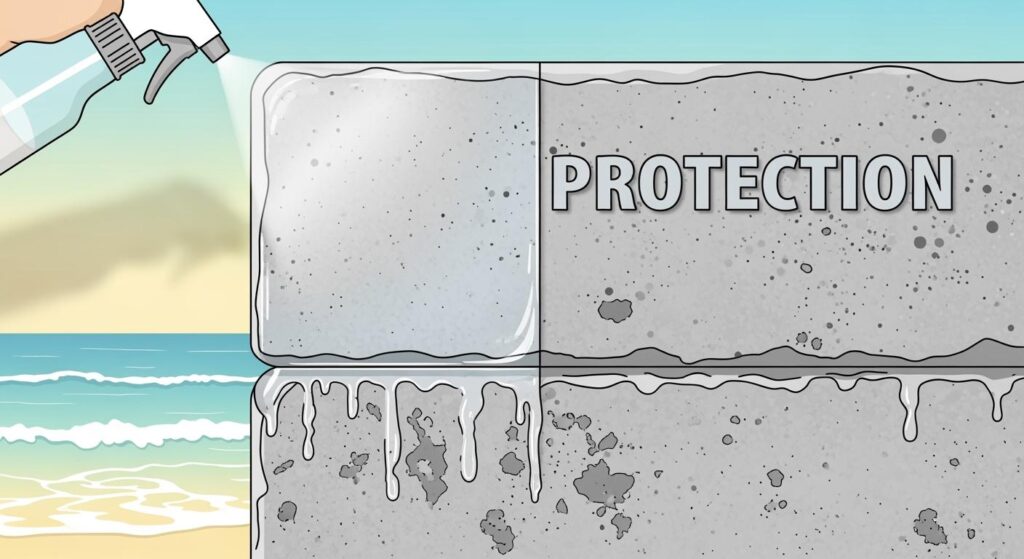
Sealer’s Role: Barrier and Water Repellency
You might wonder why sealing is such a big deal for your coastal property. Think of a sealer as an invisible shield for your concrete and masonry. It creates a robust protective layer right on the surface. This barrier is incredibly effective at stopping salt and moisture from getting in. When you seal your concrete, you prevent those tiny, damaging chloride ions from penetrating and reaching your rebar. This simple yet powerful step significantly boosts the durability and lifespan of your concrete and masonry. It’s a crucial part of effective concrete protection coastal areas, safeguarding against the relentless coastal environment.
Long-Term Benefits of Proper Sealing
Proper sealing offers huge long-term benefits that go beyond just keeping things looking good. You will definitely see reduced maintenance costs. Sealed surfaces resist dirt and grime much better, so cleaning is often just a simple hose down, even after a storm. This protective barrier actively guards against common coastal threats like fungi, acid reactions, dust, water damage, mould, and moss. These are all prevalent in humid coastal conditions, and sealing reduces the need for frequent repairs and cleaning.
Investing in quality sealing now leads to significant long-term savings. You extend the lifespan of your concrete structures, preventing early replacement and keeping your property looking its best for years. Sealing also helps stop pavers from becoming loose and provides an extra layer of protection against corrosive elements. This proactive approach ensures your property has long-term resilience against the harsh coastal climate. It’s smart financial planning for your coastal home, as this kind of protection is vital for maintaining your property’s value and structural integrity.
Beyond Sealers: Broader Coastal Erosion Solutions
While sealers are vital for protecting your concrete, you should also consider broader coastal erosion solutions for your property. These larger-scale measures offer comprehensive protection against the relentless forces of the sea. They work in conjunction with sealers to create truly resilient coastal properties.
Structural Defences for Coastal Properties
You can implement various structural defences to safeguard your property from coastal erosion. Think about options like seawalls, which act as a solid barrier against waves. These can be vertical seawalls or tiered seawalls with promenades, offering both protection and amenity. You might also consider terminal protection structures. These are often located as far landward as possible, ideally wholly on private property. Property owners typically construct, own, and maintain these assets. A seawall should have the narrowest footprint to reduce erosion and beach encroachment. It should also have the least sand nourishment requirements, both upfront and during maintenance. Beach nourishment, where you add sand to the beach, can also complement these structures. These are all crucial coastal erosion solutions.
Durable Materials for Resilient Coastal Construction
Beyond sealers, choosing the right building materials is key for effective coastal design. You need materials that can withstand the harsh saline atmosphere. Aluminium slat fencing is an excellent choice. It resists corrosion and offers lightweight strength, especially where salt concentrations are high. It needs low maintenance, so you avoid routine sanding or staining. Aluminium’s natural oxide layer protects against further oxidation, maintaining its integrity for many years.
Composite slat fencing also provides resilience. It combines wood and polymer technologies, giving you the look of timber with the durability of plastics. This material resists common timber issues like warping, splitting, and rotting. Many composite products use recycled wood fibres and high-density polythene, making them eco-friendly.
For shutters, PVC is a popular choice. It resists moisture, so it won’t swell or crack in damp conditions. PVC shutters are easy to clean and maintain their colour. Aluminium shutters are also strong and reliable for exterior use. High-quality aluminium shutters have specialised coatings to protect against corrosion and salt damage. These durable materials are essential coastal erosion solutions.
Choosing the Right Sealer for Coastal Concrete
You have learned about the damage salt spray causes and why sealing is so important. Now, you need to choose the right sealer. This decision is crucial for effective concrete protection coastal areas. The market offers many options, but not all are suitable for the harsh coastal environment. You need to understand the differences to make the best choice for your property’s long-term resilience.
Penetrating vs. Topical Sealers
When you look for a concrete sealer, you will mainly find two types: penetrating and topical. They work in very different ways.
Feature | Penetrating Sealers | Topical Sealers |
|---|---|---|
Mechanism of Action | These sealers soak into your concrete’s pores. They react chemically to form a water-repellent barrier inside the concrete. They do not sit on the surface. | These form a protective film or coating on top of your concrete. They create a physical barrier that covers the surface. |
Appearance | They do not change your concrete’s natural look or finish. Your concrete keeps its original appearance, texture, and can still breathe. | They can change how your concrete looks. Often, they give it a glossy or “wet” appearance. Some might even darken the concrete or alter its texture. |
Durability | They usually last longer because they are protected within the concrete itself. This makes them less prone to wear from foot traffic, UV rays, and rubbing. | Their durability varies a lot depending on the product and how much traffic it gets. They are more likely to scratch, peel, and wear off, especially in busy areas or with sun exposure. |
Protection | They mainly protect against water getting in, freeze-thaw damage, efflorescence (white powdery deposits), and stains from within the concrete. They let the concrete breathe. | They offer excellent protection against stains, abrasion, and chemical spills. They can also make the colour stand out and provide a decorative finish. |
Maintenance | You generally need to reapply them less often, usually every 5-10 years. This depends on the product and local weather conditions. | You might need to reapply them more frequently, typically every 1-5 years. This is especially true in areas with heavy use or exposure to the elements. |
Application | They are often easier to apply, sometimes needing just one coat. The surface must be clean and dry before you start. | They can be harder to apply evenly, as you need to avoid streaks or bubbles. You must prepare the surface carefully, including cleaning and sometimes etching. |
Cost | They can cost more at first, but their long life can make them more cost-effective over time. | They are generally cheaper to buy initially, but needing to reapply them more often can increase your long-term costs. |
Best Use Cases | Perfect for driveways, patios, pool decks, and other outdoor areas where you want to keep the natural look and breathability of the concrete. They are critical for protecting against water and freeze-thaw damage. | Good for garage floors, workshops, decorative concrete, and places where you want a specific look (like gloss) or better stain resistance. |
Breathability | They let the concrete breathe. This stops moisture from getting trapped underneath, which can cause problems like efflorescence or spalling. | They can trap moisture inside the concrete if you do not apply them correctly or if the concrete already has moisture issues. This can lead to peeling or blistering. |
UV Resistance | They generally have excellent UV resistance because they are not exposed on the surface. | Some topical sealers can turn yellow or break down over time with long exposure to UV rays, especially acrylic-based ones. |
Slip Resistance | They do not affect how slippery your concrete is. | They can make the concrete surface more slippery, especially when wet. You can add anti-slip additives to some topical sealers to help with this. |
For coastal erosion solutions, penetrating sealers are often the preferred choice. They offer superior long-term protection against salt and moisture ingress without altering the concrete’s natural appearance.
Key Features for Coastal Sealers
When you live by the sea, your sealer needs specific qualities to stand up to the environment. You should look for these key features:
High Chloride Resistance: This is non-negotiable. You need marine-grade sealers that offer enhanced protection against salt exposure. These specialised sealers create barriers specifically designed to prevent chloride penetration. They protect the reinforcing steel from corrosion, which is a critical part of coastal erosion solutions.
UV Stability: The strong coastal sun can cause unsealed concrete to fade and weaken. Your sealer must create a protective barrier against UV rays, reducing colour loss and preventing surface degradation. Polyurethane sealers are highly durable, lasting 5-10 years, and resist yellowing from UV exposure. They incorporate UV stabilisers to maintain their performance even under intense sun. Penetrating sealers are also effective for outdoor use, resisting weather and UV damage while maintaining the concrete’s appearance, and can last 5–10 years.
Breathability: Your concrete needs to breathe. A good sealer allows moisture vapour to escape from within the concrete. This prevents moisture from getting trapped, which can lead to issues like efflorescence or spalling.
Water Repellency: This goes hand-in-hand with chloride resistance. The sealer must effectively repel water, preventing it from carrying salt into the concrete’s pores.
Ease of Application: While professional application is always recommended, a sealer that is relatively straightforward to apply can save time and labour costs.
BANDě Concrete Densifier: A Recommended Solution
For robust concrete protection coastal areas, you should consider a high-performance penetrating sealer like BANDě Concrete Densifier. This type of solution works by chemically reacting within the concrete, making it denser and less porous. It does not just sit on the surface; it becomes an integral part of the concrete itself. This deep penetration creates an effective chloride barrier, which is vital for preventing salt damage and contributing to long-term coastal erosion solutions. It provides a long-lasting barrier against efflorescence, surface salts, moisture, and chemical attacks. It also reduces sandstone decay due to salt attack and low pH precipitation, and eliminates white salt spotting on brickwork. This makes it an excellent choice for treating rising and salt damp.
Sealer Recommendations for Coastal Applications
Choosing the right sealer depends on the specific surface and how much salt spray it gets. Here are some recommendations for your coastal property:
Driveways and Patios: These areas experience heavy foot and vehicle traffic, plus direct exposure to salt spray. You should prioritise industrial or commercial-grade coatings, similar to Marine Grade Colorbond for roofs. Penetrating sealers are particularly beneficial here as they protect against saltwater erosion. Look for sealers containing water repellents such as siliconate or silane siloxane. These prevent water from entering concrete micropores and protect against salt damage from both water and air moisture. While acrylic sealers can create a durable film for protection, penetrating options offer superior long-term performance in high-exposure areas.
Foundations and Walls: For vertical surfaces and foundations, deep-penetrating sealers are crucial. They create effective chloride barriers, protecting the structural integrity of your home. Marine-grade sealers with proven salt resistance are essential here. Silane-based penetrating sealers are a strong choice, though professional maintenance schedules typically recommend renewal every 3-5 years, or even sooner in extreme coastal climates. This is a key part of your coastal erosion solutions.
General Masonry (Brickwork, Stone): For other masonry elements, you need sealers that offer similar protection against salt ingress and efflorescence. Penetrating sealers that allow the material to breathe are ideal. They will help reduce sandstone decay and eliminate white salt spotting on brickwork, contributing to the overall coastal erosion solutions for your property.
Remember, the goal is to create a comprehensive defence against the relentless coastal environment. By selecting the right high-performance sealer, you are making a significant investment in the longevity and value of your coastal home, ensuring effective coastal erosion solutions for years to come.
Sealer Application and Maintenance for Lasting Protection
You have chosen the perfect sealer for your coastal property. That is a fantastic start! However, even the best sealer will not perform its magic if you do not apply it correctly and look after it. Think of it like painting a wall; the preparation and technique make all the difference. This section guides you through getting the most out of your sealer, ensuring lasting defence against the harsh coastal elements.
Surface Preparation is Key
You might be eager to get that sealer on, but hold on a moment! The secret to a long-lasting, effective seal lies in thorough surface preparation. This phase is absolutely critical, often taking up a huge chunk of your project time – we are talking 70-80% of it! If you skip this step or do it poorly, your sealer could fail, and you certainly do not want that.
First, you need to get the surface spotless. Start by removing any loose dirt, debris, or materials. A good sweep, blow, or vacuum will do the trick. Then, it is time for a deeper clean. Pressure washing is excellent for getting rid of embedded dirt, stains, and other contaminants. Just make sure you use the right pressure so you do not damage the concrete. For stubborn issues like oil stains, organic growth, or mineral deposits, you will need specific chemical cleaners. If you have oil or grease, use specialised degreasers; they stop the sealer from sticking properly.
For non-porous surfaces, a solvent clean is best. Use the ‘two-cloth’ method: wipe with a solvent-soaked cloth, then immediately follow with a dry cloth. This stops contaminants from just moving around. If your concrete is porous, you might need to dust it, or even try abrasion cleaning like grinding or sandblasting. This removes things like laitance (a weak, powdery layer), surface dirt, form-release agents, and any old sealants. Always make sure you remove all dust and loose particles after any abrasion.
Next, check for any cracks or damage. You need to assess what kind of cracks you have and how big they are. Clean out any debris or contaminants from these cracks; this helps your repair material stick properly. Choose repair materials that suit the crack size, how much it moves, and what it is exposed to. Finally, make sure the surface is level and smooth. This gives you a uniform base for your sealer.
Before you even think about opening the sealer can, do a few final checks. Look at the weather forecast: you need optimal conditions for applying and curing, so check the temperature, humidity, wind, and rain. Test the surface moisture; it needs to be dry enough after cleaning, as too much moisture will stop the sealer from sticking. Lastly, get all your materials ready. Mix them, condition them, and set up your equipment. This ensures everything runs smoothly and your product performs consistently. Sometimes, you might need to prime the surface. Priming usually improves adhesion, and manufacturers often recommend it for certain surfaces. Just make sure the surface is clean and dry before you prime. Apply a thin film with a clean, lint-free cloth or a brush for tricky spots. Do not over-prime, as that can actually cause adhesion problems. Once primed, let it dry until all the solvent has gone. You must apply the sealer on the same day you prime; otherwise, you will need to clean and prime again.
Best Practices for Sealer Application
You have done all the hard work preparing the surface, so now it is time for the main event: applying the sealer. Getting this right means your concrete will be well-protected for years.
First, let us talk about the weather. You absolutely must not apply sealer if you expect rain within 12 hours. Also, avoid applying it if the temperature is below 5ºC or above 30ºC. Hot, windy days are also a no-go, as the sealer can dry too quickly or get blown around. Always do a small trial in a hidden spot first. This lets you check you are happy with the look and that the sealer suits your surface, as some might discolour or show uneven shading. Protect any nearby surfaces and materials by washing off splashes straight away with water. If you are spraying, avoid windy conditions to stop overspray.
Now, for the application itself. You have a few options:
Spraying: This usually gives you the most even coverage. Use low-pressure spraying equipment and apply it unreduced. A ‘wet-on-wet’ double pass works really well.
Rolling: Grab a medium nap roller. For each coat, apply it at a 90-degree angle to the previous one. Work from grout line to grout line, making sure you seal the grout lines too.
Brushing or Lambswool Applicator: These also work. If you use these methods, apply a second coat as soon as you can after the first.
No matter which method you choose, each coat needs to be a full coat. You want to fully saturate all the pores. The goal is to wet out the surface completely without letting the material pool or applying so much that it just sits on top. This allows for deep penetration.
When you apply the first coat, make sure the surface is clean, dry, and repaired. An even application is crucial for a good bond and a uniform finish. Try to maintain a ‘wet edge’ and avoid putting on too much, which can cause puddles or drips. A great technique is to load a pump-up sprayer and lightly mist a 4×4 metre zone. You want to dampen the surface, but not create runs. Immediately follow this with a half-inch nap roller on an extension handle, back-rolling the sealer into the concrete. This two-step method ensures really consistent coverage and pushes the product deep into every pore.
Overlap each pass by 10–20 cm; this helps avoid lap marks. Keep the sprayer nozzle moving and do not pause in one spot. As you go, inspect your work. If you see any pooling or uneven sheen, roll out the excess straight away.
How much sealer do you need? Always follow the manufacturer’s coverage rate on the sealer’s Technical Data Sheet. Most acrylics and penetrating sealers suggest between 0.08–0.12 litres per square metre. A single-pack solvent-based concrete sealer, for example, might cover 6–10 square metres per litre, but this really depends on how porous your surface is. Measuring the litres you need beforehand helps you avoid running short or wasting product.
Finally, keep an eye on the drying and tack-free time. This is usually 1–2 hours. Check the surface every 30 minutes by gently touching a small, hidden corner with a gloved finger. Barricade the area until the sealer is tack-free (meaning no residue comes off on your glove) before you allow any foot traffic or apply a second coat.
Ongoing Maintenance for Effectiveness
You have put in the effort to prepare and seal your concrete, so now you want that protection to last, right? Regular maintenance is key to keeping your sealer working hard against the coastal environment.
How do you know if your sealer is still doing its job? You can look for a few tell-tale signs. The most obvious one is water absorption. If water no longer beads up on the surface but instead soaks in, creating a dark patch, your sealer is losing its effectiveness. Another sign is a dull or faded appearance. If your concrete looks like it has lost its colour or just generally looks dull, the sealer’s protective qualities are diminishing. Also, if dirt and stains become much harder to remove than usual, it suggests the sealer is no longer repelling contaminants effectively.
Regular cleaning is simple but important. Just sweep away debris and hose down the surface periodically. This stops dirt and salt from building up and potentially wearing down the sealer.
So, when should you reapply? For penetrating sealers like silane/siloxane blends, you generally need to reseal every 3–5 years. However, this can vary. Factors like how much traffic the area gets and how much UV exposure it receives play a big role. For example, areas with a lot of shade or heavy use, like decks, might need resealing closer to the three-year mark. Some products might even last up to seven years, but always check your specific product’s recommendations and keep an eye on those signs of diminishing performance. By staying on top of these checks and reapplying when needed, you ensure your concrete remains well-protected against the relentless coastal conditions.
You now understand the vital need for proactive concrete defence against relentless coastal salt spray. Remember to grasp the threat, choose a high-performance sealer like BANDě Concrete Densifier, and apply it correctly with good maintenance. Investing in quality now prevents expensive repairs, safeguarding your coastal home’s value. Start defending your investment today!
FAQ
Can I apply concrete sealer myself?
You certainly can, but professional application often gives the best results. Proper surface preparation and even application are crucial for effective protection against salt spray.
What is the best type of sealer for coastal properties?
Penetrating sealers, like silanes or siloxanes, are usually best. They offer superior chloride resistance and UV stability, which is vital for long-term coastal erosion solutions.
Why are comprehensive coastal erosion solutions vital for my property?
They protect your investment from relentless salt spray and moisture. Implementing robust coastal erosion solutions prevents costly damage, preserving your home’s structural integrity and value.
See Also
A Comprehensive Handbook for Selecting Superior Concrete Surface Protection
Discovering the Optimal Concrete Sealer Tailored to Your Requirements
Top Ten Concrete Sealers for Ultimate Surface Defence and Longevity
Elevate Your Surfaces: Premier Concrete Protective Sealers for the Year 2025
Optimal Concrete Sealer for Harsh South African Sun and Intense Heat