
Yes, a moisture barrier is often critical for protecting your construction project from moisture-related damage. Without it, you risk severe consequences like structural decay and harmful mold growth. For example, professional mold remediation averages around $2,200. A moisture barrier helps prevent moisture and can prevent mold infestations, stopping water damage before it starts. Understanding these crucial components is key.
Key Takeaways
A moisture barrier protects your building from water damage. It stops liquid water and water vapor from getting inside.
Moisture barriers are important for basements, concrete floors, and humid rooms. They prevent mold and structural problems.
Choosing the right moisture barrier and installing it correctly saves money. It also makes your building last longer and keeps the air healthy.
Understanding the Moisture Barrier: Definition and Function
What is a Moisture Barrier?
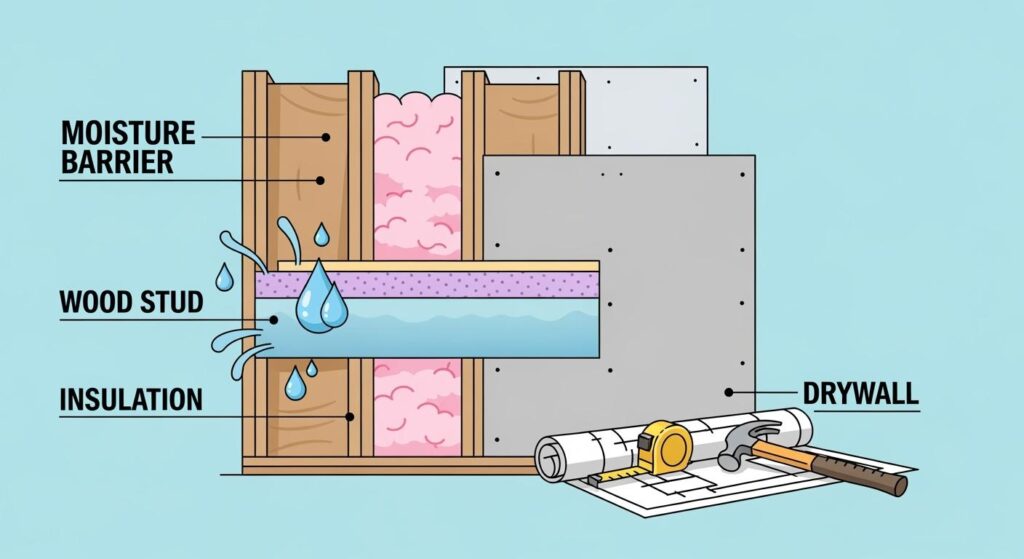
You might wonder, what exactly is a moisture barrier? Simply put, a moisture barrier is a material or system that stops unwanted water from getting into your building. Think of it as a protective shield for your construction project. It creates a physical block, keeping liquid water and water vapor from moving where they shouldn’t. This barrier is a key part of your building’s defense against the elements. It helps you avoid costly repairs down the road.
How Moisture Barriers Prevent Moisture Damage
Moisture barriers work in several smart ways to prevent moisture. They tackle different types of water intrusion.
Stopping Liquid Water: Imagine tiny pores in your building materials. Water can get sucked through these pores, a process called capillary suction. A good moisture barrier creates “breaks” in the material. These breaks are small gaps or sheathing materials that stop water from moving further. They allow water to drain away or shed, rather than soaking into your walls. For example, impermeable sheathing like extruded polystyrene (XPS) can make moisture condense on its surface and drain down, keeping it out of your building materials.
Blocking Water Vapor: Water vapor can also move through your walls, especially from areas with high humidity to drier ones. This is called vapor diffusion. To stop this, you use materials with low permeance, often called vapor retarders. These materials effectively slow down or stop vapor movement.
Controlling Airborne Moisture: Air can carry a lot of moisture. If air leaks into your walls, it can bring moisture with it, leading to condensation and water damage. Air barriers are crucial here. They make your wall assemblies airtight, stopping air, and thus airborne moisture, from moving between conditioned and unconditioned spaces.
You can see that different types of barriers play specific roles. A Water-Resistive Barrier (WRB), for instance, prevents liquid water from reaching your building’s structure. You typically install it between your siding and exterior sheathing. All these components work together to protect your building envelope.
Moisture Barrier vs. Vapor Barrier: Key Distinctions
People often use “moisture barrier” and “vapor barrier” interchangeably, but they are not always the same thing. Understanding the difference is important for your project.
A moisture barrier is a broad term. It refers to any material that resists the passage of liquid water. Its main job is to prevent moisture from getting in.
A vapor barrier, on the other hand, specifically targets water vapor. Its job is to slow or stop the movement of water vapor through building materials. We classify vapor barriers by their “permeance,” which measures how easily water vapor can pass through them.
Class I Vapor Retarders: These are nearly impermeable. They have a permeance of 0.1 perm or less. Think of materials like polyethylene sheeting or foil-faced insulation.
Class II Vapor Retarders: These are semi-impermeable, with a permeance between 0.1 and 1.0 perm. Asphalt-coated kraft paper is an example.
Class III Vapor Retarders: These are semi-permeable, with a permeance between 1.0 and 10 perms. Latex paint or gypsum board can fall into this category.
Choosing the right type depends on your climate and building design. You need to consider whether you are dealing with liquid water, water vapor, or both.
When to Use a Moisture Barrier: Key Scenarios
You now understand what a moisture barrier is and how it works. But when do you really need one? Many situations call for this crucial protection. Ignoring these needs can lead to significant problems.
Protecting Below-Grade Structures
Structures below ground level are always at risk from soil moisture and groundwater. This includes basements, crawl spaces, and foundations. You must protect these areas. For unvented crawl spaces, for example, building codes require a 100% floor vapor barrier. You need to seal and tape this barrier six inches up the wall. Then, you attach it to the stem wall or insulation. All seams of the vapor barrier must overlap six inches. You also seal them with tape.
Beyond the vapor barrier, unvented crawl spaces need extra moisture control. You can use dehumidification, conditioned air supply, or a continuous exhaust fan. Sometimes, a plenum works for existing structures. While the IRC suggests a minimum 6-mil vapor retarder, you should consider materials with lower permeance. These materials meet or exceed ASTM E1745 standards. A 6-mil poly might let too much moisture vapor through. Choosing products with a permeance below 0.01 perms, even after conditioning, helps prevent mold infestations, odors, and poor indoor air quality. A proper moisture barrier in these areas is your first line of defense.
Safeguarding Concrete Slabs and Flooring
Concrete slabs are another common area needing a moisture barrier. Moisture can rise through concrete from the ground below. This moisture can damage your flooring. The Guide to Concrete Floor and Slab Construction recommends a vapor retarder thickness of at least ten mils. This thickness helps resist puncturing during and after construction. ASTM E1643 and ASTM E1745-17 also offer guidelines for using, installing, and inspecting under-concrete slab vapor barriers.
You should use a low permeance vapor retarder for floor slabs. This is especially true if you plan to install moisture-sensitive coverings, adhesives, or coatings. Always check the manufacturer’s literature for specific requirements. You can also add a capillary break of granular material beneath the slab. However, remember this won’t stop vapor from reaching the slab. Consider using concrete with a water-cement ratio not exceeding 0.45. This helps the slab dry faster. For moisture-sensitive applications, place the vapor retarder directly beneath the slab and on top of the granular material. You also need to address potential curling stresses in the slab’s reinforcement design. If heavy construction traffic will occur, use a vapor retarder material that is 15 mil or thicker. This prevents significant water damage to your finished floors.
High-Humidity Environments and Interior Spaces
Certain interior spaces naturally have higher humidity. Bathrooms, kitchens, and laundry rooms are prime examples. These areas are prone to moisture buildup from showers, cooking, and appliances. You should consider a moisture barrier behind drywall and under flooring in these spots. This protects against moisture damage and structural risks. Even in high-humidity climates, a general approach to moisture management throughout your home is wise.
Signs You Might Need One
Sometimes, your building tells you it needs a moisture barrier. You just need to know what to look for. An initial visual examination often reveals clear signs of water damage.
Efflorescence: You might see white, powdery deposits on concrete surfaces. This indicates water moving through the slab.
Dampness or Wet Spots: Look for visible moisture on the slab. This is especially noticeable after rain or in low areas.
Mold or Mildew: A musty odor is a big clue. You might also see visible fungal growth on items, walls, or the slab itself.
Floor Covering Failures: Your flooring can show signs of trouble. This includes peeling vinyl, buckling laminate, or cupping hardwood installed over the slab.
These signs all point to moisture intrusion. They tell you that you need to address the problem. Installing a moisture barrier can prevent further water damage and protect your investment.
Types of Moisture Barriers and Their Applications
Common Types of Moisture Barriers
You have several types of moisture barriers to choose from. Each suits different project needs. Polyethylene sheets are common. High-Density Polyethylene (HDPE) sheeting is tough, flexible, and resists chemicals, moisture, and impact. Use it as a vapor barrier in foundations. Fluid-applied membranes offer seamless coverage for complex shapes, resisting UV. Peel-and-stick membranes are simpler to install, providing immediate waterproofing. However, their many seams can increase break potential. For concrete, consider advanced solutions like BANDě. It deeply penetrates concrete, making it permanently hard and shiny. It prevents dust and stains, is eco-friendly, and applies quickly, preventing water damage.
Factors for Selection: Climate and Project Needs
Choosing the right moisture barrier depends on your climate and project. In colder climates, place a vapor retarder on the interior. Avoid Class I barriers if you have high summertime moisture. For hot, humid zones, an impermeable air barrier on the exterior works best, blocking moisture entry. In mixed climates, a permeable air barrier on the exterior sheathing allows moisture to escape. Match the barrier to your specific conditions.
General Installation Principles
Proper installation is key for any of the types of moisture barriers. First, prepare your surface. Lay out the barrier in moisture-prone areas. Overlap joining sheets by six inches and use vapor barrier tape for a secure bond. Ensure the barrier is continuous and free from damage. Repair any punctures before finishing. Improper kickout flashing or inadequate ground clearance can lead to failure and water damage.
Benefits of Proper Moisture Barrier Installation
Installing the right moisture barrier offers many long-term benefits. It protects foundations from moisture intrusion and safeguards wooden structures from rot and termites. Metal components are preserved from corrosion, extending material lifespan. Understanding the different types of moisture barriers helps you choose the best protection. It also improves indoor air quality. By preventing moisture, you stop mold growth, reducing allergens and asthma triggers. Some barriers even block radon gas, making your home healthier.
A moisture barrier is not just an option; it’s a smart investment for your project’s long-term health and value. You prevent costly remediation and extend building material lifespans. Assess your specific needs, consult professionals, and consider high-performance solutions like BANDě for concrete to ensure comprehensive water protection and avoid water damage.
FAQ
Is a moisture barrier the same as waterproofing?
No, they are different. A moisture barrier stops liquid water and vapor. Waterproofing completely prevents water penetration, even under pressure.
Can I install a moisture barrier myself?
You can, but professional installation is best. Proper installation ensures effectiveness. Mistakes can lead to future moisture problems.
What happens if I don’t use a moisture barrier?
You risk mold growth, structural damage, and poor indoor air quality. This leads to costly repairs later.
See Also
Selecting the Optimal Wall and Floor Moisture Barrier for Your Upcoming Project
Understanding Wall and Floor Moisture Barriers: Essential Protection for Your Property
Your Comprehensive Guide to Effective Wall and Floor Moisture Barriers at Home
Choosing the Ideal Moisture Barrier for Superior Electronic Packaging Protection
Finding the Perfect Concrete Dustproofer for Your Specific Construction Project Needs