
Dry shake floor hardeners enhance concrete wear resistance and durability. Untreated concrete surfaces often suffer dusting and abrasion. A dry shake concrete hardener offers a superior concrete solution. This hardener creates a tough, durable concrete surface. Proper application of these dry shake hardeners is key. It maximizes the concrete’s abrasion resistance. This guide provides comprehensive application methods. You get optimal, lasting concrete results from this hardener. Applying this hardener correctly ensures your concrete’s long-term durability.
Key Takeaways
Dry shake hardeners make concrete floors stronger. They help floors last longer and resist damage.
Proper application is very important. You must prepare the concrete, apply the hardener correctly, and cure it well.
Following all steps ensures a durable floor. This saves money on repairs later.
Preparing for Optimal Dry Shake Floor Hardener Application
What are Dry Shake Hardeners?
You might wonder, what exactly are dry shake hardeners? These specialized materials blend hard-wearing aggregates, cement, and additives. They significantly boost your concrete’s wear and impact resistance. Some formulations include color pigments for decorative finishes. You’ll find different types: natural quartz aggregate offers exceptional hardness and abrasion resistance for high-traffic concrete. Synthetic (non-metallic) mineral aggregates, like crushed granite, give enhanced consistency. Metallic and metallic alloy aggregates, such as stainless steel, increase hardness. Non-metallic dry shake hardeners use natural minerals. Synthetic dry shake concrete hardener, with polymers, provides superior abrasion resistance and cohesiveness. This dry shake concrete hardener makes your concrete surface much tougher, enhancing its overall durability.
Concrete Mix and Placement
A successful dry shake hardeners application starts with the right concrete mix. You need a strong base for the hardener to bond properly. Aim for concrete strength of C25 or above. Keep your water-to-ash ratio below 0.50, and target a concrete slump between 70-100mm. Minimizing segregation and controlling water secretion are crucial. Admixtures help with fluidity. The concrete mix ratio influences hardener dosage and application time. Finer coarse sand and adjusted superplasticizer quantities greatly improve your floor hardener’s performance.
Assessing Concrete Readiness
Knowing when your concrete is ready for the dry shake concrete hardener is vital. The concrete surface must be firm enough to support your weight without deep indentations, yet wet enough to absorb the hardener. This happens after initial bleed water evaporates. Test by walking; your foot should leave only a slight impression. Proper timing ensures the hardener integrates effectively.
Environmental Considerations
Environmental factors greatly impact your application. High temperatures, low humidity, or strong winds can dry the concrete surface too quickly. This prevents the hardener from bonding properly. Very cold temperatures slow concrete setting. Always check the forecast. Use windbreaks or shelters to control the environment. This planning ensures your dry shake hardeners integrate effectively.
Tools and Equipment
You need the right tools for a smooth application. For finishing, use a power trowel with blades or plastic pans to achieve a burn finish. For grinding and polishing, systems like the Concria™ Fast power trowel polishing system are excellent. Ensure tools are clean and working well. Having everything ready ensures a consistent, durable surface with optimal abrasion resistance. This floor hardener application needs good tools.
Applying Dry Shake Hardeners: The Process for Wear Resistance
Surface Preparation and Initial Screeding
You begin the application process with careful surface preparation. First, ensure your fresh concrete is level and smooth. You achieve this by screeding the concrete. This initial screeding removes excess concrete and creates a uniform plane. It’s a crucial step because a well-prepared concrete surface allows the dry shake hardeners to integrate properly. You want a consistent base for the hardener to bond with the concrete. This sets the stage for a strong, monolithic bond.
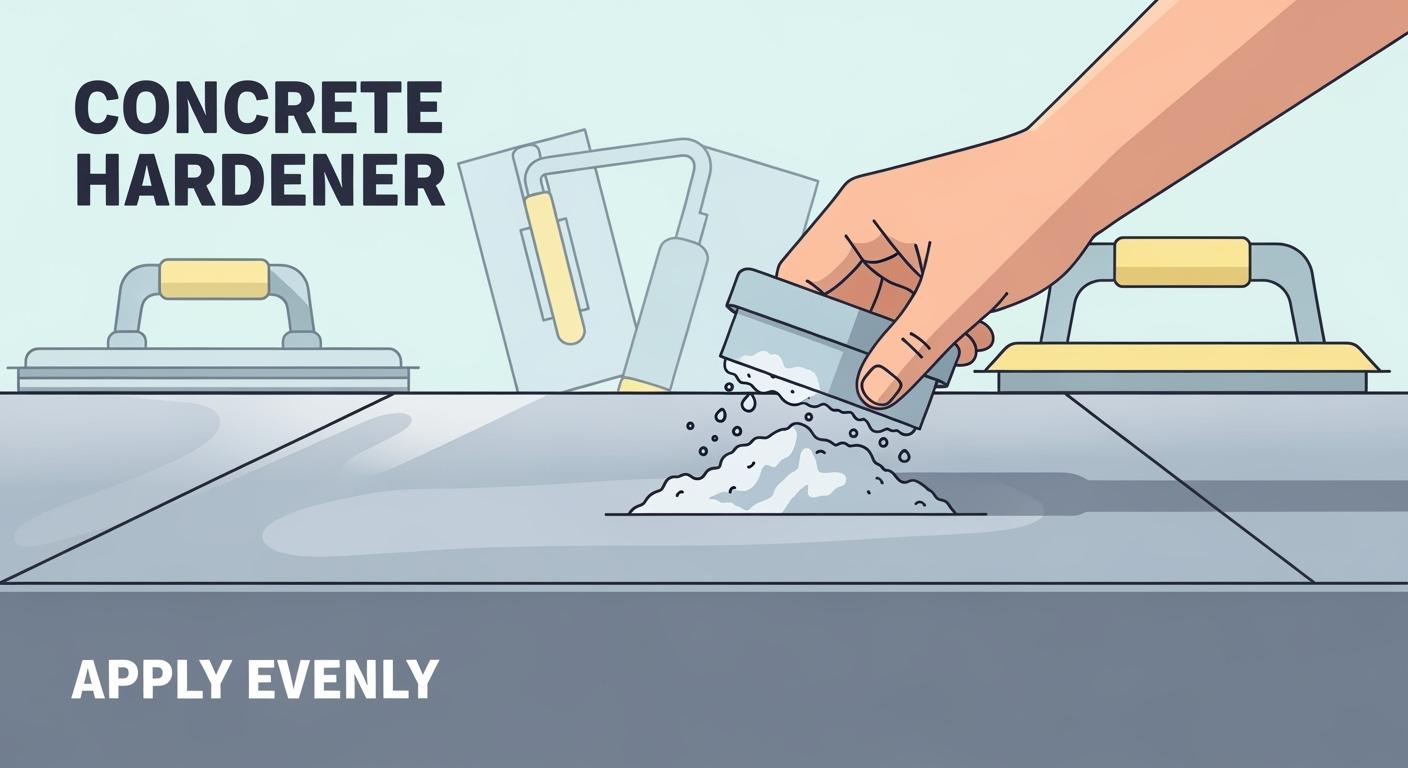
Initial Hardener Application
Once the concrete reaches the right consistency – when you can walk on it and leave only a slight impression – you apply the first layer of hardener. You can apply the dry shake hardeners by hand or with a mechanical spreader. For heavy forklift traffic or high abrasion, you should apply dry shake hardeners at a rate of 5 to 7 kg/m². If you expect lighter forklift traffic or moderate abrasion, 3 kg/m² is usually enough. Medium forklift traffic or moderate abrasion typically requires 5 kg/m². Remember, the maximum application rate for dry shake hardener by hand is generally 5 kg/m². Mechanical applications can go up to 7.5 kg/m², and you should use mechanical application for rates of 5 kg/m² or higher. Distribute the hardener evenly across the entire concrete surface. This ensures uniform coverage and consistent abrasion resistance.
First Floating and Integration
After you apply the initial hardener, you need to integrate it into the fresh concrete. You do this with a power trowel fitted with floating blades. Set these blades flat, at 0 degrees. This initial pass creates suction and helps remove any surface imperfections. You perform this floating pass at a slow, uniform pace. The goal is to thoroughly wet the hardener with the concrete’s bleed water and embed it into the surface. This step is vital for creating a strong, monolithic bond between the dry shake concrete hardener and the concrete slab.
Subsequent Hardener Application
You will often need a second application of dry shake hardeners. This ensures full coverage and enhances the final properties of the concrete. You apply the second layer after the first application has absorbed moisture and the surface can again support your weight. Distribute this second layer evenly, just like the first. This helps achieve a consistent color (if you are using a colored hardener) and further boosts the abrasion resistance of the concrete surface.
Final Troweling for Optimal Wear Resistance
This is where you achieve the ultimate density and wear resistance for your concrete. You perform several passes with a power trowel, adjusting the blades as the concrete hardens.
Floating Pass: You start with floating blades set flat (0 degrees). This pass creates suction and removes surface imperfections. You perform it at a slow, uniform pace.
Compaction and Polishing: When a person sinks only 1-2mm, with no standing water, and a slight indentation appears with finger pressure, you begin this phase. You use a small blade angle (almost parallel) for low-speed, large-area finishing. Perform 2-3 cross-operations (longitudinal and transverse), increasing the blade angle and rotational speed with each pass. This eliminates disc marks, compacts surface slurry, and achieves a dense, bright finish.
Final Calendering: Just before the final setting, when you almost don’t sink when standing and only hard finger pressure leaves marks, you perform the final calendering. You use the maximum blade angle to the ground and run at high speed. This polishing aims for extremely high smoothness and eliminates all spatula marks.
For fine grinding, you install metal power trowel blades flat initially. For final finishing, you slightly lift the trowel’s tail to form a small angle (around 5°) for better shearing and calendering. You employ cross-operation methods (e.g., horizontal and vertical passes) for flatness. Increase rotational speed and lateral movement appropriately. Perform multiple, progressively lighter and faster polishing rounds to ‘flatten’ the surface. You conduct final fine polishing just before the concrete sets for optimal brightness. These precise troweling techniques compact the surface layer, enhance density, and seal capillary pores. This significantly improves the abrasion resistance, impermeability, and dust resistance of your concrete surface.
Curing and Protection
Immediately after you complete the final troweling, you must begin the curing process. Proper curing is essential for the long-term durability and performance of your floor hardener. You can use a high-quality curing compound, which forms a membrane over the concrete surface to retain moisture. Alternatively, you can use wet curing methods, like covering the concrete with wet burlap or plastic sheeting. This prevents rapid drying, which can lead to cracking and reduce the effectiveness of the hardener. Protect the newly finished concrete surface from heavy traffic, impacts, and spills for at least 7 days. This ensures the hardener fully cures and achieves its maximum strength and abrasion resistance.
You now understand how correctly applied dry shake hardeners significantly boost your concrete’s abrasion resistance and durability, extending its floor life and reducing dusting. Every stage, from preparing the concrete to curing the hardener, is vital for optimal results on your concrete surface. Following these detailed steps and manufacturer guidelines ensures a successful, durable concrete. This investment in proper dry shake concrete hardener application provides long-term cost savings, reducing maintenance and replacement needs for your concrete. A well-applied hardener truly pays off, offering superior abrasion resistance and a long-lasting surface. This hardener makes your concrete perform better, making the dry shake hardeners a smart choice for any concrete surface. The right dry shake concrete hardener application is key.
FAQ
Can I apply dry shake hardener to existing concrete?
No, you apply dry shake hardener to fresh, wet concrete. It needs the concrete’s bleed water to integrate and form a strong, durable concrete surface.
How much hardener should I use for my concrete?
Application rates vary. For heavy traffic, use 5-7 kg/m². For lighter use, 3 kg/m² is often enough. Always check the hardener manufacturer’s guidelines for your specific concrete hardener.
What happens if the concrete surface dries too quickly during application?
Rapid drying prevents the hardener from bonding properly. This can lead to a weak concrete surface. Use windbreaks or shelters to control the environment and protect your concrete. This ensures your hardener works on the surface.
See Also
Choosing the Optimal Concrete Floor Hardener: A 2025 Selection Guide
Maximizing Concrete Durability: 2025 Floor Hardener Application Techniques Explained
Selecting Ideal Concrete Densifiers, Hardeners, and Sealers: Your 2025 Handbook
Understanding Liquid Concrete Floor Hardeners, Sealers, and Densifiers Explained
Essential Guide: Selecting the Best Protective Sealer for Concrete Surfaces