
Repairing pitted concrete floors is important, especially when considering how to fix a pitted concrete floor effectively. It helps keep your space safe and looking good. If you ignore pits, they can get worse. Fixing this yourself can save money and also make you feel proud.
You may ask what causes these annoying pits. Common reasons are chemical damage from harmful substances. Freeze-thaw cycles also cause problems, as water expands when it freezes in the concrete. Knowing these issues can help you stop future damage.
Remember, you don’t need to be a pro to fix a pitted concrete floor. With the right tools and materials, you can achieve great results!
Cause | Description |
|---|---|
Chemical attack | Acids or other harmful substances can cause pitting. |
Freeze-thaw cycles | Water freezing and expanding in pores can cause pitting over time. |
Key Takeaways
Fixing pitted concrete floors makes them safer and nicer.
Pitting often happens because of chemicals and freeze-thaw cycles.
Collect important materials like BANDě Shaving Agent and epoxy fillers.
Clean and get the surface ready before you start fixing for the best results.
Repairing floors by yourself saves money and raises property value.
Materials and Tools for Repair
Essential Materials
When you are ready to fix your pitted concrete floor, having the right materials is very important. Here’s a list of materials you will need:
BANDě Shaving Agent: This is a cement-based material. It is great for filling pits and small holes. It sticks well and lasts long, making it a top choice for your repair.
Epoxy Joint Fillers: These come in hard and semi-hard types. They protect and repair joints effectively.
Polyurea Joint Fillers: These fillers are flexible and strong. They are perfect for many concrete repair jobs.
Epoxy Injection Resin: This material seals cracks and holds structures together. It stops moisture from causing more damage.
Chemical Hardeners: Products like lithium or sodium silicate make surfaces harder. They help stop soft pitting.
Tip: Always make sure the repair area is clean and free of dirt before using any materials. This step is very important for a strong bond.
Recommended Tools
Having the right tools can make your repair work easier and faster. Here’s a list of tools you should gather:
Concrete Grinder: This tool smooths the surface and gets it ready for repair.
Trowel: Use this to apply the BANDě Shaving Agent and smooth it out.
Safety Gear: Don’t forget to wear gloves, goggles, and a dust mask. They protect you from dust and harmful substances.
Mixing Bucket: You will need this for mixing your repair materials. It helps get the right consistency.
Squeegee: This tool helps spread materials evenly on the surface.
Tool | Purpose |
|---|---|
Concrete Grinder | Smooths the surface for better repair adhesion |
Trowel | Applies and smooths the repair material |
Safety Gear | Protects against dust and debris |
Mixing Bucket | Mixes repair materials to the right consistency |
Squeegee | Spreads materials evenly across the surface |
By gathering these materials and tools, you will be ready to repair your pitted concrete floor. Remember, preparation is very important!
How to Fix Pitted Concrete Floor: Preparation
Cleaning the Surface
Before you start fixing, cleaning the surface is very important. A clean area helps your repair materials stick well and last longer. Here’s how to prepare your concrete:
Inspect the Surface: First, check how deep and bad the pitting is. This helps you know how much repair material you will need.
Remove Debris: Use a pressure washer or a scrub brush with a cleaner to get rid of dirt, grease, and loose stuff. This step is key because dirt and oil can stop your repair materials from sticking.
Clear Loose Concrete: Use a chisel and hammer to chip off any loose or crumbling concrete. This makes a stable edge for your repairs.
Tip: If the damage is deep or the nearby concrete is smooth, think about using a bonding agent to help with sticking.
Assessing the Damage
After cleaning, it’s time to check the damage. This step helps you find the best way to fix things. Here’s what to do:
Look for cracks or problems that need fixing before polishing. Fixing these first will give you a smoother finish.
Use a vacuum or compressed air to clear any leftover debris from the area. This makes sure no dust or dirt gets stuck under your repair materials.
Make sure the surface is completely dry after cleaning. Trapped moisture can cause poor sticking and bad results.
By following these preparation steps, you set yourself up for success in repairing your pitted concrete floor. Remember, taking time to prepare well can make a big difference in getting a strong and nice finish.
Repair Process for Pitted Concrete Floor
Filling the Pits
Now that you have cleaned the surface, it’s time to fill the pits. This step is very important for fixing your concrete floor. Follow these steps to fill effectively:
Dampen the Area: First, wet the concrete with water. Use a broom to sweep away any puddles. The surface should be damp but not soaked when you put on the resurfacer.
Mix the Resurfacer: Get your concrete resurfacer ready by following the instructions. Make sure it is thick enough for filling.
Pour and Spread: Pour the resurfacer mix into a puddle on the slab. Spread it right away with a trowel or squeegee.
Fill the Cracks: For deeper pits, mix a thicker resurfacer. Make sure it is level with the surrounding floor.
Smooth It Out: Use a squeegee to push the resurfacer into the concrete. Work it into the pores and pits. Aim for a thickness of about 1/8 inch.
Cure the Surface: Let the filled areas cure for at least 24 hours before walking on them.
Tip: Using the BANDě Shaving Agent can improve the bond and strength of your repairs. This helps make a long-lasting finish.
Smoothing the Surface
After filling the pits, you need to smooth the surface for an even finish. Here’s how to do that:
Troweling: Use a steel trowel on the wet resurfacer for a smooth look. If you’re unsure, let someone experienced do this part for the best results.
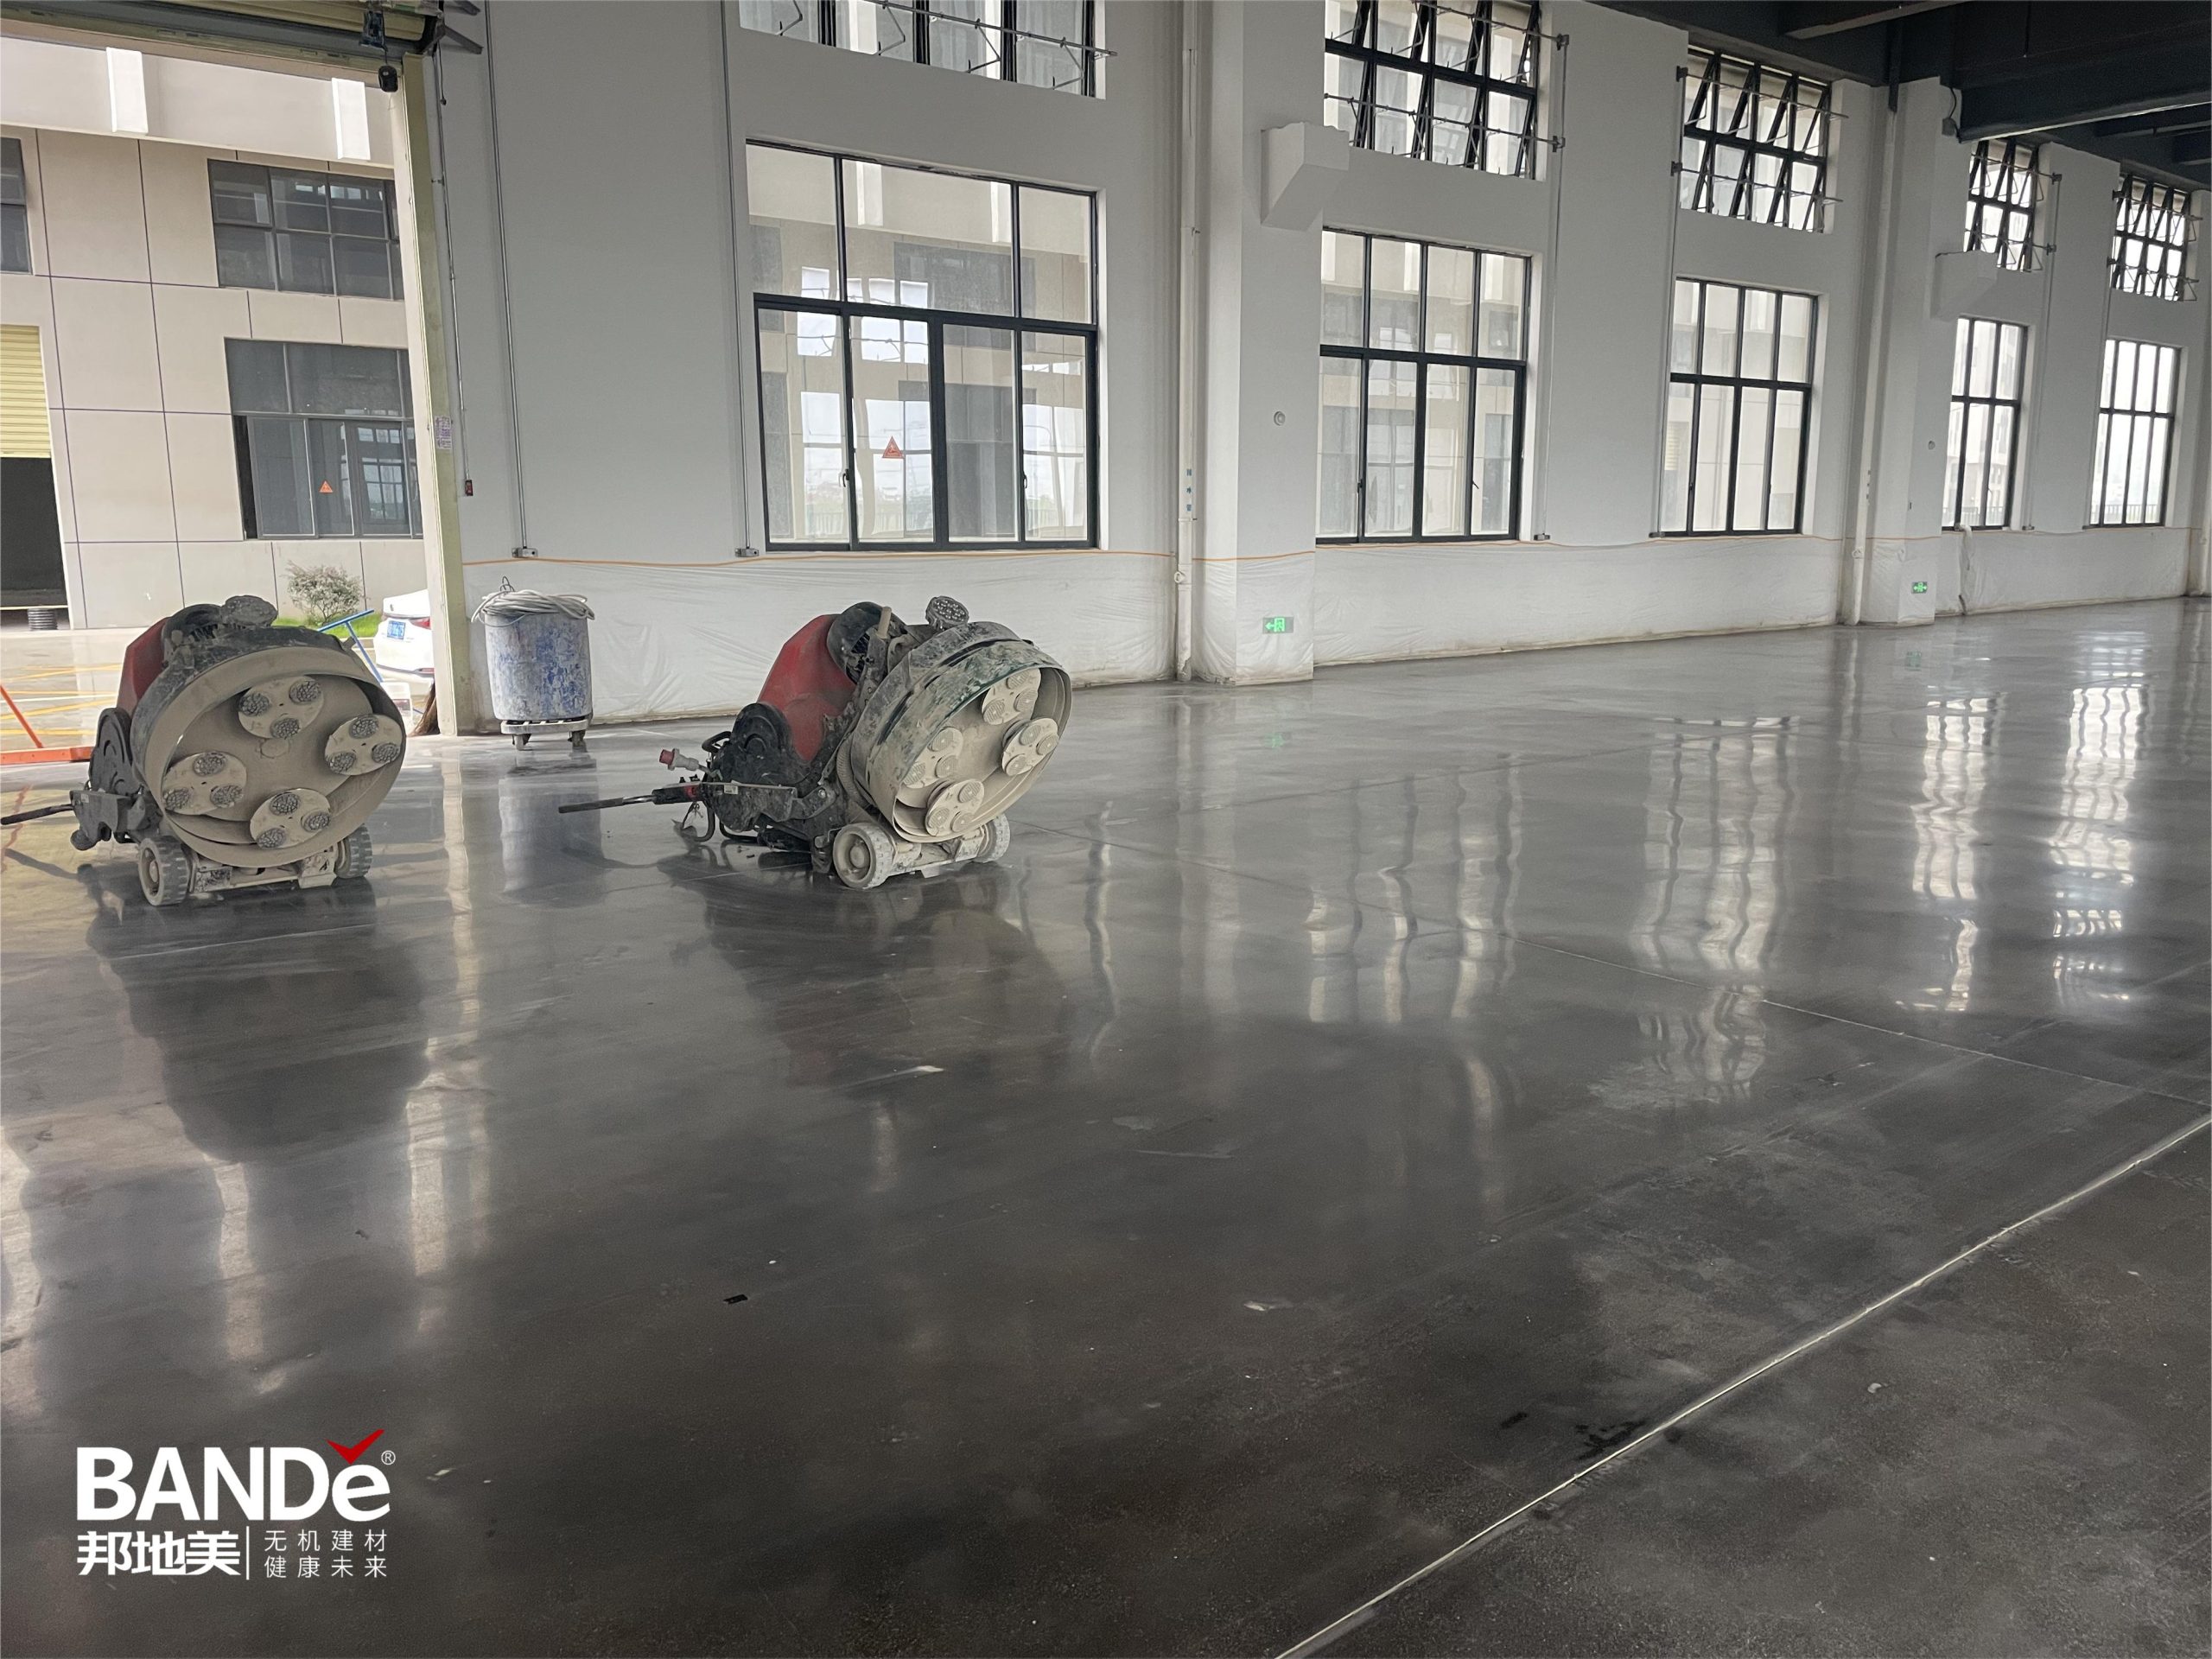
Mechanical Methods: After the filler has dried, use a concrete grinder or floor buffer to fix any bumps. Keep the grinder moving to avoid uneven spots. Remember to wear safety glasses and a dust mask during this work.
Polishing: For a shiny finish, use diamond abrasives with concrete grinders. An experienced contractor can help check if your floor can be polished.
Method | Description | Tips |
|---|---|---|
Troweling | Use a steel trowel on wet concrete for a smooth finish. | Let an experienced finisher handle it for best results. |
Mechanical Methods | Use a concrete grinder or floor buffer to remove imperfections. | Keep the grinder moving to avoid uneven spots. Wear safety glasses and a dust mask. |
Polishing | Use diamond abrasives with concrete grinders for a high-gloss finish. | An experienced contractor can assess if the floor is suitable for polishing. |
Curing and Finishing
Curing is very important for making sure your repairs last. Here’s what you need to know:
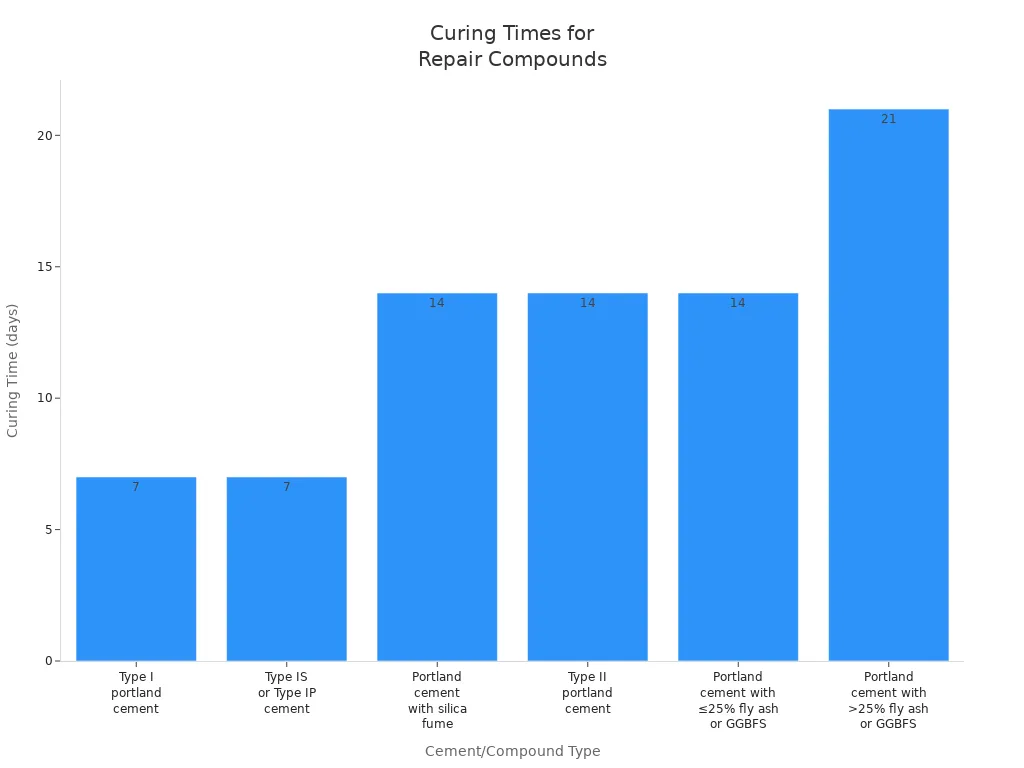
Moist Cure Fresh Concrete: Keep the concrete wet by spraying or misting it often, especially in the first 7 to 10 days.
Cover Your Slab: Use covers like polyethylene sheeting to keep moisture in and slow down evaporation.
Apply a Curing Compound: If wet curing isn’t possible, use a curing compound to reduce moisture loss.
Avoid Premature Drying: Protect the concrete from direct sunlight and wind to stop quick evaporation.
Type of Cement/Compound | Curing Time |
|---|---|
Type I portland cement | 7 days |
Type IS or Type IP cement | 7 days |
Portland cement blended with silica fume | 14 days |
Type II portland cement | 14 days |
Portland cement blended with 25% or less fly ash GGBFS | 14 days |
Portland cement blended with more than 25% fly ash or GGBFS | 21 days |
By following these steps, you can successfully repair your pitted concrete floor. This will help it look great and last for many years.
Benefits of Repairing Pitted Concrete Floors
Aesthetic Improvements
Fixing your pitted floors can really improve how your space looks. A smooth and well-kept surface not only looks nicer but also feels better to walk on. Here are some important aesthetic benefits:
Fresh Appearance: Filling in those ugly pits makes your floor look fresh and clean. You’ll feel a big change in how your space seems.
Increased Value: A nice floor can raise the overall value of your property. Buyers like a polished look, which can help sell your home faster.
Customization Options: After repairs, think about adding an epoxy floor coating. This can bring color and shine, making your floor both useful and stylish.
Tip: A little work on repairs can lead to a big change in how your space looks!
Increased Durability
Fixing pitted concrete floors also makes them stronger. Here’s how:
Enhanced Resistance: When you repair your floors, you make them better at resisting moisture, chemicals, and wear. Techniques like resurfacing and sealing create a protective layer that keeps your floor safe.
Longer Lifespan: By fixing pitting now, you stop more damage later. This smart choice can save you from expensive repairs in the future.
Cost-Effective Solution: Repairing your floors can cost 50-80% less than replacing them. For example, lifting and leveling a driveway might only cost $800 to $2,000, while a full replacement could be around $4,000. Resurfacing a two-car garage floor usually costs less than $200, making it a wise investment.
By taking time to repair your pitted concrete floors, you not only make them look better but also help them last longer. It’s a win-win that benefits both looks and function!
Fixing pitted concrete floors is a great project. It can make your space look better and last longer. Here are some important points:
Improved Aesthetics: A smooth floor looks nice and welcoming.
Increased Longevity: Good repairs can help your concrete last longer.
Cost-Effective: Fixing pitting now saves you money later.
Doing repairs yourself can feel good, but checking the damage carefully is very important. You might run into problems like bad finishing or moisture. To fix these issues, use the right methods and ask experts for help if needed.
So, get ready to work on those pitted floors! With the right materials, like the BANDě Shaving Agent, and some effort, you can get great results. 🛠️
FAQ
What causes pitted concrete floors?
Pitted concrete floors happen because of chemical damage, freeze-thaw cycles, or heavy use. These things can make the surface weak and cause ugly pits.
How long does it take to repair pitted concrete?
Fixing pitted concrete can take a few hours or up to two days. It’s important to let it cure, so wait at least 24 hours before walking on it.
Can I use epoxy kits for garage floors?
Yes! Epoxy kits are great for garage floors. They seal and protect your concrete. They give a strong finish and make it look better.
How do I maintain my repaired concrete floor?
To keep your fixed concrete floor nice, clean it often with mild soap and water. Don’t use strong chemicals that might harm the surface.
Is it necessary to hire a professional for repairs?
You can fix pitted concrete yourself, but hiring a pro gives a better finish. If you’re not sure, ask an expert for help.
See Also
Comprehensive Guide To Repairing Cracks In Concrete Surfaces
Definitive Handbook For Polishing Concrete Floors With BANDě
Keeping Your Polished Concrete Floors Shiny And Bright