


Transform your floors with non-metallic floor hardener. This product enhances floor hardness, minimizes dust, and extends the service life of your surfaces. Proper application techniques ensure you achieve durable and visually appealing results.
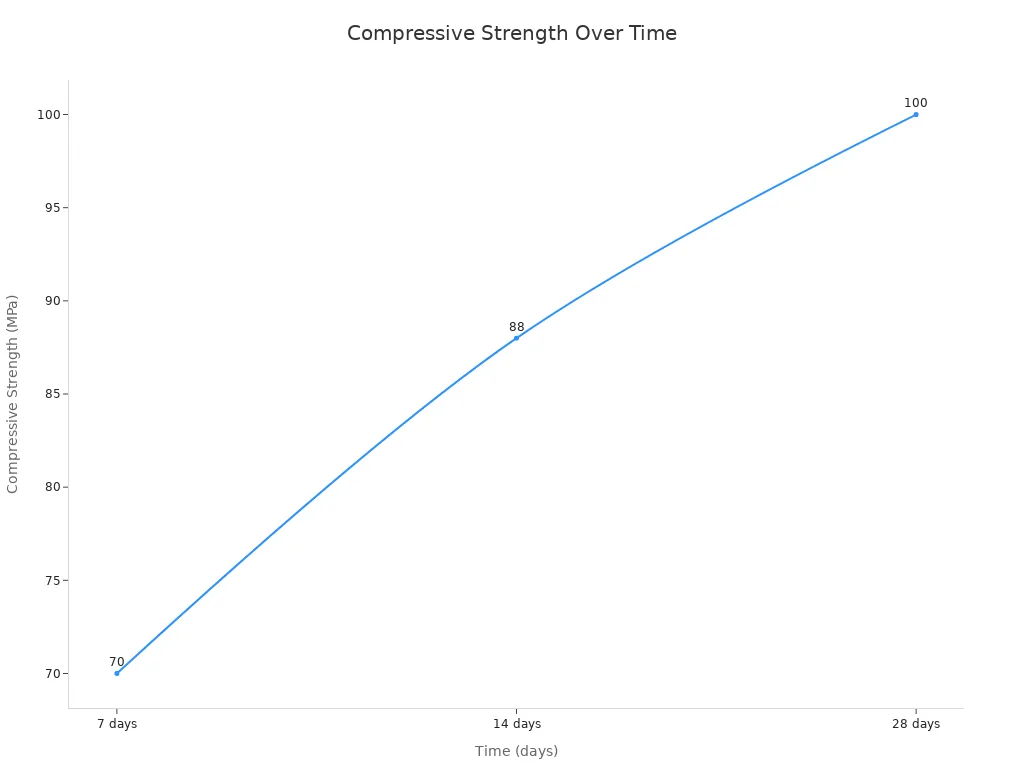
Did you know? After 28 days of application, the compressive strength of treated floors can reach 100 MPa, demonstrating significant improvements in durability.
Key Takeaways
Gather the right tools and materials before starting your project. This includes non-metallic floor hardener, power trowels, and cleaning equipment to ensure a smooth application.
Properly prepare the surface by cleaning, stripping, etching, and grinding. This step is crucial to prevent issues like peeling and ensure strong adhesion.
Follow the correct mixing and application techniques. Mix thoroughly and apply in layers for optimal durability and appearance.
Preparation
Tools and Materials
Before you begin applying non-metallic floor hardener, gather the necessary tools and materials. Here’s a list to help you prepare:
Non-metallic floor hardener: Ensure you have enough product for your project size.
Power trowels: Use these mechanical tools for uniform integration of the hardener.
Mixing buckets: Calibrated buckets help achieve the correct resin-to-hardener ratios.
Broom or vacuum: Clean the surface thoroughly before application.
Pressure washer or rotary floor scrubber: These tools assist in removing contaminants effectively.
Using the right tools ensures a smooth application process. Incorrect tools can lead to issues like peeling, blistering, and discoloration, which compromise the flooring system’s integrity.
Surface Preparation
Proper surface preparation is crucial for the success of your application. Follow these steps to ensure your concrete surface is ready:
Cleaning: Use a mild, pH-neutral detergent and water to clean the surface. A pressure washer or rotary floor scrubber can help remove stubborn contaminants.
Stripping: If a sealer is present, use a stripper like Brickform Strip-It to remove it. Sealers can act as bond breakers.
Etching: Apply diluted hydrochloric acid or Brickform E-Etch to open the pores of the concrete. This step ensures even distribution and prevents burn marks.
Grinding: For stubborn contaminants, use a grinder to remove coatings and level uneven surfaces.
Scarification: This method removes thick coatings and levels very uneven surfaces, leaving a rough profile.
Shot Blasting: This technique creates a rough surface profile using small steel balls, which is effective for surface preparation.
Inadequate surface preparation can lead to peeling and delamination due to contaminants hindering adhesion. Therefore, take your time to ensure the surface is clean and ready for the hardener.
Safety Precautions
Safety should always be a priority during the application process. Follow these guidelines to protect yourself and others:
Ensure cross-ventilation by opening windows and doors when working in enclosed environments.
Use industrial fans or exhaust systems to remove fumes and maintain air quality.
Clearly mark restricted areas with warning signs and barriers to prevent unauthorized entry during application and curing.
Mix in a well-ventilated space to prevent the buildup of harmful fumes.
Seal containers tightly and store them in a cool, dry area away from direct sunlight or heat sources.
By adhering to these safety precautions, you can create a safer working environment while applying non-metallic floor hardener.
Application Steps for Non-Metallic Floor Hardener

Mixing Process
Mixing the non-metallic floor hardener correctly is essential for achieving optimal results. Follow these steps to ensure a proper mix:
Measure the Components: Use calibrated mixing buckets to measure the hardener and resin accurately. This ensures you maintain the correct ratio.
Combine Ingredients: Pour the resin into a clean mixing container. Gradually add the non-metallic floor hardener while stirring continuously. This helps prevent clumping and ensures even distribution.
Mix Thoroughly: Use a mechanical mixer or a mixing paddle attached to a drill. Mix for at least 3-5 minutes until you achieve a uniform consistency. Avoid introducing air bubbles during this process.
Tip: Always mix enough product for your immediate application area. This prevents waste and ensures consistency across your flooring.
Application Techniques
Applying the non-metallic floor hardener requires precision and care. Here’s how to do it effectively:
First Application: Begin by applying the first shake of hardener. Use about two-thirds of the total amount. Spread it evenly across the surface using a power trowel. This initial layer sets the foundation for durability.
Second Application: After the first layer has set, apply the remaining hardener at right angles to the first application. This cross-application technique promotes uniform coverage and enhances the floor’s strength.
Multiple Applications: For the best results, consider applying the hardener in two shakes. This method ensures that you achieve uniform coverage and optimal hardness.
Note: Common challenges during application include cracking, moisture damage, and wear from heavy traffic. Using high-quality non-metallic floor hardeners can help mitigate these issues.
Curing Times
Curing times are crucial for the effectiveness of the non-metallic floor hardener. Here’s what you need to know:
Initial Cure: Allow the floor to cure for at least 24 hours before subjecting it to light foot traffic. This initial period is vital for the hardener to bond effectively with the concrete.
Full Cure: For maximum strength, wait at least 7 days before heavy machinery or forklift operations. During this time, the hardener continues to enhance the floor’s durability.
Environmental Factors: Keep in mind that temperature and humidity can affect curing times. Warmer temperatures may speed up the process, while cooler conditions can slow it down.
By following these application steps, you can ensure that your floors receive the full benefits of the non-metallic floor hardener, leading to enhanced durability and reduced maintenance needs.
Post-Application Care

Cleaning Tips
To keep your floors looking great, follow these cleaning tips:
Regularly sweep or vacuum to remove dirt and debris. This prevents scratches and maintains slip resistance.
Use a damp mop with a mild pH-neutral cleaner for deeper cleaning. Avoid harsh chemicals that can damage the surface.
Promptly clean up spills to prevent staining and maintain the floor’s integrity.
Avoid abrasive tools that can scratch or dull the surface. Opt for soft cloths or mops instead.
Maintenance Strategies
Implement these strategies to preserve the appearance and durability of your non-metallic floor hardener:
Conduct routine inspections to identify signs of wear or damage. Address any issues promptly to maintain functionality.
Place area rugs or mats in high-traffic areas to reduce wear and tear.
Reapply a protective topcoat every few years to enhance durability and appearance.
Protect surfaces from heavy loads, moisture, and chemical exposure to extend their lifespan.
Troubleshooting
If you encounter issues with your floor, consider these troubleshooting steps:
If you applied the hardener in cold conditions, consider tenting and heating the area or using winter-grade catalysts.
In high-humidity environments, use dehumidification or moisture-tolerant primers.
Ensure proper mixing and application techniques to avoid coating failures.
By following these post-application care tips, you can maximize the lifespan of your non-metallic floor hardener and keep your floors looking their best.
Applying non-metallic floor hardener transforms your floors into durable and visually appealing surfaces. Follow these key steps: prepare your tools, clean the surface, mix the hardener, and apply it correctly. A well-applied hardener enhances floor longevity and appearance. For example, corporate headquarters in Chicago reported no yellowing after three years and maintained a gloss retention of 92%. You can confidently take on this project, knowing it will yield long-lasting results.
FAQ
What is non-metallic floor hardener?
Non-metallic floor hardener is a product that enhances concrete floor hardness and abrasion resistance without using metallic components.
How long does it take to cure?
Initial curing takes 24 hours for light foot traffic. Full curing requires at least 7 days for heavy machinery use.
Can I apply it in cold weather?
Yes, but you should use winter-grade catalysts and ensure proper heating to achieve optimal results.
See Also
Understanding Floor Hardeners: Their Function and Benefits
Key Insights on BANDě Concrete Floor Hardener for You
Exploring Concrete Floor Hardeners: Purpose and Operation
