
Dusty, worn-out concrete floors are frustrating. Crystal floor hardeners offer a superior, long-lasting solution, even tripling your floor’s service life and boosting abrasion resistance by up to 400%. Optimal results require precise mixing, correct application, and effective curing. This crystal floor hardener installation guide provides a comprehensive step-by-step guide for your perfect, durable floor.
Key Takeaways
Crystal floor hardeners make concrete floors much stronger and last longer. They also stop dust.
Good preparation is important. Clean the floor well and use the right safety gear.
Mix the hardener carefully and apply it evenly. Let the floor cure fully for the best results.
Preparing for Your Crystal Floor Hardener Installation
Before you begin your crystal floor hardener installation, proper preparation is key. This step-by-step guide helps you lay the groundwork for a successful project.
Understanding Crystal Floor Hardener Basics
A crystal floor hardener isn’t just a coating; it chemically transforms your concrete. It works through a process called densification. When you apply a liquid silicate hardener, it reacts with the concrete. This process fills the natural pores and voids in the concrete through crystalline growth. It internally hardens the concrete and locks up dust. Specifically, this reaction targets calcium hydroxide, which would otherwise create chalky dust. Many hardeners contain well-graded metallic and non-metallic aggregates, activating chemicals, and selected Portland cements, or finely graded non-metallic quartz aggregates, plasticizers, and cement binders. These hardeners are ideal for both new and old concrete in industrial or residential settings, making your floors durable and dust-free.
Essential Safety and Tool Preparation
Your safety comes first! Gather your essential materials and tools before you start. You will need:
Eye Protection: Use safety glasses or chemical goggles with side shields.
Respiratory Protection: A respirator is crucial to prevent inhaling chemical vapors.
Gloves: Choose gloves made from materials like nitrile rubber or neoprene. Avoid cotton and latex.
Chemical-Resistant Sleeves and Coveralls: These protect your skin from splashes.
Aprons: Consider a chemical-resistant apron for extra protection.
Boots: Sturdy boots protect against splashes.
Tools: Mixing buckets, stirrers, low-pressure sprayers, squeegees, and rollers are your essential materials and tools for application.
Critical Surface Readiness Steps
A clean, prepared surface ensures your hardener works effectively. First, remove all surface contamination like dirt, oil, grease, and old sealers. You can use methods like blast cleaning (shot blasting is great for horizontal surfaces) or power tool cleaning. If you have existing sealers or paint, remove them using mechanical techniques like shot blasting or diamond grinding. After cleaning, repair any cracks. Ensure the surface is dry and porous. You can check for moisture by taping an 18×18 inch plastic sheet to the surface for at least 16 hours. If you see moisture, find and fix the source before proceeding. Finally, vacuum or blow down the surface to remove any dust or loose particles.
Mixing and Pouring Your Hardener for Optimal Results
This section is your step-by-step guide to successfully mixing and pouring your crystal floor hardener. Pay close attention to these details. They ensure your floor hardens correctly and lasts for years.
Precise Mixing Ratios and Techniques
You must follow the product guidelines for ratios and mixing times. This is critical. You can measure accurately by weight or volume. Your manufacturer’s instructions will tell you which method to use. For example, some products use a 2:1 ratio, while others use 1:1. If you use incorrect mixing ratios or do not mix thoroughly, you will face problems. Your floor could end up soft, sticky, or uneven. These errors also create weak spots that will never properly cure. So, precise measurement for your mix ratio is key.
When you combine components, use appropriate mixing tools. A low-speed drill with a paddle mixer works best. This helps you achieve a homogeneous mixture. Mix for a specific duration, typically around 3 minutes. Remember to scrape the sides and bottom of your container. This ensures all parts are fully incorporated. This careful mixing is vital for the success of your mixing and pouring epoxy resin process.
Managing Pot Life and Batch Sizes
You need to understand pot life. This is the time you have before the mixed hardener starts to gel and become unusable. The average pot life for epoxy resin is about 30 minutes. However, this can change based on the specific resin and hardener you use.
Pot Life (minutes) | |
|---|---|
FAST | 9-14 |
SLOW | 80-100 |
Typical (General) | 120-150 |
Temperature greatly affects pot life. If the temperature increases by 10°C (18°F), your pot life can be cut in half. To test pot life accurately, combine 100 grams of resin and hardener. Use the correct mix ratio in a 2-inch diameter container at 72°F. Stir for 2 minutes. Then, watch when it gels. Avoid body heat, as it can speed up curing and give you wrong results. Manage your batch sizes carefully. This prevents premature hardening. Only mix what you can apply within the pot life. This is a crucial step in mixing epoxy resin.
Application Methods and Even Coverage
If your resin component needs warming for better flow, do that before mixing. Do not warm the hardener. You have several methods for application. You can use a low-pressure sprayer, a roller, or a squeegee. Make sure you get uniform coverage. Avoid puddling the product.
For crystal floor hardeners, a general estimate for coverage is about 325 square feet per 1.3 gallons. However, the actual coverage rate changes a lot based on the concrete’s porosity. If you have exceptionally porous substrates, you might need a second coat. This ensures adequate hardening.
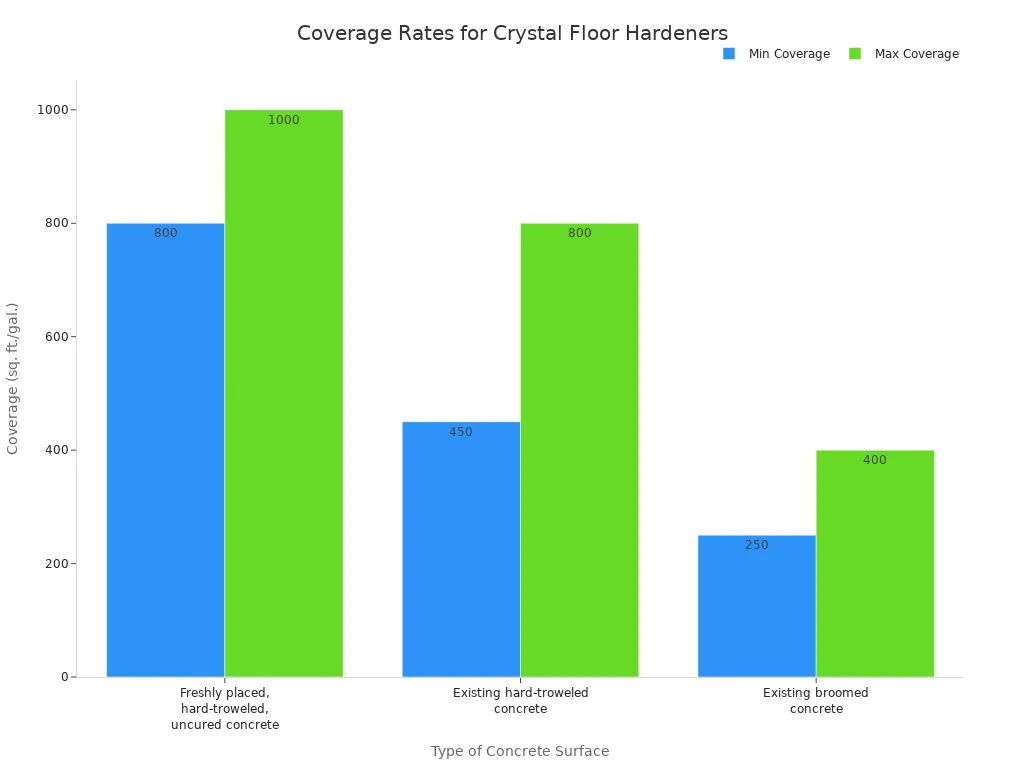
Here are some estimated coverage rates:
Type of Surface | Coverage (sq. ft./gal.) |
|---|---|
Freshly placed, hard-troweled, uncured concrete | 800 – 1000 |
Existing hard-troweled concrete | 450 – 800 |
Existing broomed concrete | 250 – 400 |
These rates are estimates. They can vary based on your concrete’s finish and porosity.
Divide your floor into sections. This helps you maintain a wet edge. This means you always apply new product onto wet product. This prevents lines and marks. If you need subsequent coats, follow the drying times between applications. This crystal floor hardener installation guide helps you achieve a smooth finish.
When you are mixing resin and hardener, pour the mixed hardener slowly onto the surface. Start from the center and move outwards. This gives you controlled flow. This step-by-step guide ensures you get the best results from your mixing and pouring epoxy resin process.
Curing and Maintaining Your Hardened Floor
You’ve applied your crystal floor hardener, but the job isn’t over yet! The curing process is just as vital as the application. This phase transforms your treated floor into a durable, long-lasting surface. Let’s explore what happens next and how you can ensure the best results.
The Science of Hardener Curing
When you apply a crystal floor hardener, you kickstart a fascinating chemical reaction. This isn’t just about drying; it’s about hydration and densification. During the hydration of concrete, about 20% of the Portland cement transforms into lime, or calcium hydroxide. This lime doesn’t add structural strength. However, concrete densifiers chemically react with this lime. This reaction produces calcium silicate hydrate (CSH) crystals. CSH is the natural binding element that gives concrete its strength. The sealant particles from the densifier travel through microscopic pores and hairline cracks, forming even more CSH. This increased amount of CSH fills these pores, making your concrete denser, harder, and less susceptible to water damage and staining. This entire curing process is what gives your floor its incredible strength and dust-proofing benefits.
Optimizing Curing Conditions
Achieving a proper cure depends heavily on the environment. Typically, you’ll see initial hardening within a few hours, but a full cure can take days or even weeks. Temperature and humidity are big players here. For instance, cold temperatures can slow down curing, while high temperatures can speed it up.
You want to maintain ideal temperature and humidity levels. Aim for around 75°F (24°C) with low humidity for optimal curing. High humidity can really mess things up. It can delay the curing of topcoats and trap moisture underneath the surface. This excessive moisture can lead to surface bubbling, improper adhesion, premature chipping, yellowing or hazing, and even delamination within months. You might also notice a cloudy finish or an oily surface layer if the air is too moist. To avoid these issues, prepare your hardener in a dry environment and keep humidity levels below 80% during application and curing. Make sure there’s no excess dew in your storage area or in the mixture itself.
Protect your floor from extreme conditions during this critical time. Direct sunlight can cause rapid drying and uneven curing. Freezing temperatures can halt the chemical reaction altogether. Rain, of course, is a no-go. Avoid heavy traffic, spills, and cleaning during the initial curing phase. Give your floor time to strengthen and densify properly.
Troubleshooting Common Hardener Issues
Sometimes, things don’t go exactly as planned. Don’t worry; you can often fix common issues.
Have you noticed uneven application or streaks? Several factors can cause this. Applying a finish that’s too thin can lead to streaks and an uneven appearance. Recoating before the previous coat is totally dry is another culprit; applying a new coat too soon can cause streaks. Dirty equipment, like unclean mops or buckets, can introduce residue that ruins your floor finish. Also, never use previously frozen floor finish; it won’t apply successfully and will produce streaks. Not applying enough product, or applying it too heavily, can also result in streaking. Make sure you allow enough dry time between coats. Rushing coats without sufficient dry time can trap moisture and cause streaking, especially after three coats.
What if your product isn’t hardening properly? This is a common concern when curing epoxy. The most frequent reason is an incorrect resin-to-hardener ratio. An imprecise mix means the chemical reaction can’t complete, leaving you with a tacky finish. Always measure accurately and consult your manufacturer’s data sheet for the correct ratio. Temperature troubles also play a role. The curing epoxy process is highly temperature-dependent. An ideal range of 70-75°F (21-24°C) is recommended for most resins to ensure proper flow and curing. Both your workspace and the product components should be at room temperature before mixing. Inadequate mixing is another big one. You must mix thoroughly, scraping the sides and bottom of your container to ensure all components are fully incorporated. Environmental factors, like cold temperatures or high humidity, can also hinder curing. Finally, contaminants on the surface, such as dust, grease, or moisture, can prevent proper bonding and curing. Always ensure your surface is clean and dry before you begin this step-by-step guide to a perfect floor.
You now understand the amazing benefits of crystal floor hardeners. They give you enhanced durability, less dust, and better looks. Always follow manufacturer instructions, mix precisely, apply carefully, and cure properly for success. This crystal floor hardener installation guide is your step-by-step guide. You can confidently achieve professional, long-lasting, and beautiful floors.
FAQ
Can I apply crystal hardener over painted concrete?
No, you cannot. You must remove all paint, sealers, and coatings first. The hardener needs direct contact with the concrete to work. 🚫
How soon can I walk on my hardened floor?
You can typically allow light foot traffic within 2-4 hours. Wait 24 hours for heavier traffic. Always check your product’s specific guidelines. 🚶♀️
Do I need to seal the floor after applying the hardener?
No, you do not. The hardener densifies and protects the concrete. It makes additional sealers unnecessary for most applications. ✨
See Also
Choosing The Ideal Concrete Floor Hardener: A 2025 Selection Guide
Maximizing Concrete Lifespan: 2025 Application Guide For Floor Hardeners
2025 Comparative Guide: Selecting The Best Floor Hardener Solutions
Understanding Liquid Concrete Hardeners: Sealers And Densifiers Explained
Concrete Floor Hardeners: Their Purpose And Functional Mechanisms Explained