Fixing wall cracks quickly is important to implement a wall crack solution and stop more damage. If you ignore these problems, they can cause serious issues. These include safety risks and money problems. You can fix cracks on your own. Doing repairs yourself saves money and feels good. With the right tools and supplies, you can easily fix drywall. This keeps your home safe and looking nice.
Remember, fixing things on time helps you avoid expensive repairs later!
Key Takeaways
Find out what type of wall crack you have. This helps you choose the best repair method. Different cracks show different problems.
Use good tools and materials for repairs. This gives a smooth finish and stops future issues.
Follow clear steps for fixing cracks. Good preparation and careful work lead to lasting results.
Check often for new cracks. Finding them early can save you time and money on repairs.
Think about ways to prevent cracks. Controlling humidity and keeping drainage working well helps avoid future wall cracks.
Wall Crack Solution Overview

When you see cracks in your walls, it’s important to know their types and causes. Different cracks can show different problems in your home. Here’s a list of common wall cracks:
Type of Crack | Description | Causes |
|---|---|---|
Vertical cracks | Go up and down; may be a little slanted. | Happen because of concrete shrinking; narrow cracks are okay, but wide ones may mean foundation issues. |
Diagonal cracks | Slanting cracks (30-75 degrees) from one spot to another. | Show serious structural problems; caused by uneven foundation settling or too much moisture. |
Stair step cracks | Look like stairs along brick joints. | Similar reasons as diagonal cracks; show foundation problems. |
Horizontal cracks | Show serious damage; happen because of foundation bowing. | Caused by too much pressure from water, big roots, or soil movement due to temperature changes. |
Knowing these types of cracks helps you find the right solution. Fixing them on time is very important for your home’s safety. Here are some reasons to fix cracks quickly:
Small hairline cracks may just need simple fixes.
Big cracks need expert repairs for safety and stability.
Waiting to fix cracks can make things worse.
Fixing cracks quickly can stop small problems from becoming big ones.
Wall cracks can show serious structural issues.
Fixing problems quickly is key to keeping your home strong.
Reasons for wall cracks include settling, water getting in, and design mistakes.
By learning how to patch a crack well, you can fix them before they get worse. Remember, filling the crack early can save you time and money later.
Tools and Materials for Repairing Cracks

When you want to fix wall cracks, having the right tools and materials makes it easier. Below is a list of important tools and materials that will help you patch a crack in your walls.
Essential Tools
Here are the tools you need for fixing wall cracks:
Putty Knife: This helps put the filling compound in the crack.
Trowel: This tool also helps apply the filling compound.
Sandpaper: After the compound dries, sandpaper smooths it out.
Sanding Block: This is another way to smooth the surface.
Drywall Tape: This is needed for bigger cracks or holes to support the repair.
Joint Compound: This fills the cracks and gives a smooth finish.
Drywall Saw: Use this to cut out damaged areas.
Utility Knife: This is another tool for cutting out damaged parts.
Paintbrushes and Rollers: You need these for painting over the repaired area.
Recommended Materials
Choosing the right materials is very important for good repairs. Here’s a table that shows the best materials for different types of cracks:
Type of Crack | Recommended Material |
|---|---|
Drywall Cracks | Drywall compound, patching plaster |
Plaster Cracks | Patching plaster |
Concrete Cracks | Portland cement mortar, epoxy injection, polyurethane sealants |
Structural Concrete Cracks | Epoxy injection |
Non-structural Concrete Cracks | Polyurethane sealants |
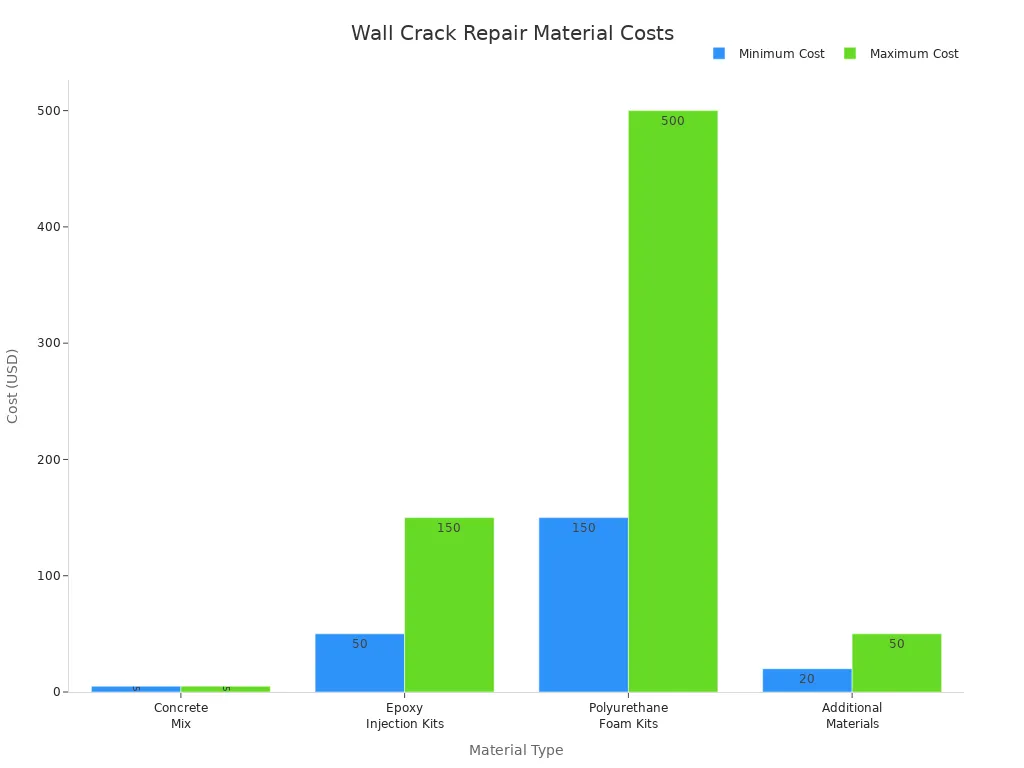
Also, here’s a comparison of the costs for different wall crack repair materials:
Material Type | Cost Range |
|---|---|
Concrete Mix | $5 per bag |
Epoxy Injection Kits | $50 to $150 |
Polyurethane Foam Kits | $150 to $500 |
Additional Materials | $20 to $50 |
With these tools and materials, you can easily patch a crack and fix your walls. Remember, using the right supplies helps you get a better finish and stops future problems.
How to Repair Cracks in Walls
Repairing Drywall Cracks
Repairing drywall cracks is a straightforward process. Follow these step-by-step instructions to achieve a smooth finish:
Clean the Area: Use a putty knife to remove any loose debris around the crack. This ensures a clean surface for the repair.
Apply Joint Compound: Spread a layer of joint compound over the crack. Allow it to dry for 24 hours.
Add More Compound: If the crack is still visible, apply a second layer of joint compound. Let it dry completely.
Sand the Surface: Once dry, lightly sand the area with 220-grit sandpaper. This helps blend the repair with the surrounding wall.
Tip: Avoid rushing the drying times. Allow each layer to dry fully before sanding. This prevents issues like cracking or uneven surfaces.
Common mistakes to avoid include:
Skipping tape where movement exists.
Not allowing the joint compound to dry fully before sanding.
Repairing Plaster Cracks
Plaster cracks require a slightly different approach. Here’s how to repair them effectively:
V-Notch the Crack: Create a ‘V’ shape along the crack to expose the substrate. This helps the new plaster adhere better.
Remove Loose Plaster: Carefully remove any loose plaster around the crack. Ensure the edges are clean and solid.
Clean the Notch: Use a vacuum and a damp sponge to clean the notch. This removes dust and debris.
Fill the Notch: Apply plaster or setting joint compound into the notch. Use 2-3 coats to achieve a flush surface.
Note: Cracks in older plaster often occur due to climate changes and structural movements. Quick fixes may not last, so ensure the substrate is solid before applying new material.
By following these steps, you can effectively repair cracks in both drywall and plaster. Remember, taking your time and using quality materials will lead to a successful repair.
How to Patch a Crack Effectively
Preparing the Area
Before you start patching, take time to prepare the area. Proper preparation ensures a long-lasting repair. Follow these steps:
Clean the Area: Remove dust and debris using a vacuum or brush. You can also use a damp cloth to ensure the surface is clean. This helps the filler stick better.
Fill the Crack or Small Hole: Use a putty knife to apply spackling or joint compound evenly over the crack. Make sure to press it into the crack for a solid fill.
Dry & Sand Lightly: Allow the filler to dry completely. Once dry, sand the surface lightly and clean it with a damp cloth. This creates a smooth base for the next steps.
Prime: Apply a quality primer to seal the filler. This prevents it from absorbing paint and ensures a uniform finish.
Applying Joint Compound
After preparing the area, it’s time to apply the joint compound. For effective crack repair, you may need to apply 2 to 3 coats of joint compound. Here’s how:
Start with a thin layer of joint compound over the crack. Use a putty knife to spread it evenly.
After the first coat dries, apply a second thin coat. Feather it out onto the surrounding wall surface for a smooth transition.
If you used tape, add another layer of joint compound over it. This helps to hide the tape and creates a seamless look.
Finishing Touches
Once the joint compound has dried, focus on the finishing touches. These steps will give your repair a professional look:
Sand the Surface: Lightly sand the dried filler to remove any raised bits. This step is crucial for a smooth finish.
Apply Additional Coats: If necessary, apply at least two more coats of joint compound. Feather each coat further out than the previous one. Sand between each coat for a smooth finish.
Prime Again: After sanding, apply a high-quality primer over the repaired area. Ensure the primer covers the entire area and extends slightly beyond it for a seamless blend.
By following these steps, you can effectively patch a crack and achieve a polished look. Remember, taking your time during each step leads to the best results!
Fix Cracks and Prevent Future Issues
After you fix wall cracks, take steps to make those repairs stronger. This will help stop problems from happening again. Here are some good methods to think about:
Evidence Description | Purpose |
|---|---|
Carbon fiber can fit different corner shapes and adds strength. | It helps keep the wall strong and stops new cracks from forming. |
Carbon fiber is very strong and keeps corners stable, stopping cracks from spreading. | This lowers the chances of cracks coming back in fixed areas. |
You can cover carbon fiber with finishing materials, keeping the wall looking good. | This keeps the wall looking nice while still giving it support. |
Knowing what causes wall cracks to come back can help you fix problems before they get worse. Here are some common reasons:
Cause | Explanation |
|---|---|
Stress on walls from foundation issues can cause cracks. | |
Shifts in framing | Settling or bad building practices can cause walls to misalign, leading to cracks. |
Temperature changes | Changes in temperature make materials expand and shrink, which can create cracks. |
Moisture problems | High humidity and water can harm the structure, causing cracks to form. |
To keep your walls in good shape and watch for new cracks, follow these tips:
Check for foundation problems regularly.
Watch how weather affects your walls.
Fill small cracks quickly.
Make sure there is good airflow.
Also, think about these ways to prevent cracks:
Control humidity with dehumidifiers and good airflow.
Have regular check-ups with a qualified expert.
Set up a drain tile system and sump pump to handle groundwater.
Change the yard’s slope to move rainwater away from the foundation.
Keep big trees and plants away from the foundation.
By making your repairs stronger and staying alert, you can keep your walls safe and stop new cracks. Regular checks and care will save you time and money later on.
Fixing wall cracks has a few important steps. First, protect your area by putting down drop cloths and covering nearby furniture. Next, use a utility knife to make the crack into a shallow V-shape. Clean the crack well, then pick the right base compound for the type of crack. For bigger cracks, use tape and add 2–3 coats of compound, making each coat wider. Finally, sand lightly and finish with primer and paint for a smooth look.
Using the right materials and methods helps your repairs last longer. For example, polymer mortars can handle tough conditions, giving you lasting results.
By doing these repairs yourself, you feel proud and make your home look better. Don’t wait to fix those small holes. Your work will be worth it in both satisfaction and home value!
FAQ
What causes wall cracks?
Wall cracks usually happen because of foundation settling, changes in temperature, or moisture problems. You might see different types of cracks, and each one shows a specific issue. Fixing these causes quickly can help stop more damage.
How can I tell if a crack is serious?
Check for cracks that are wider than 1/4 inch or those that change direction. Diagonal or stair-step cracks might mean there are structural problems. If you notice these signs, talk to a professional for help.
Can I paint over repaired cracks?
Yes, you can paint over cracks that have been fixed. Make sure the joint compound is fully dry and sanded smooth. First, apply a primer to make the surface even, then paint for a nice finish.
How long does it take for repairs to dry?
Drying times depend on the material used. Joint compound usually takes about 24 hours to dry. However, thicker layers might need more time. Always check the instructions from the manufacturer for exact drying times.
Should I hire a professional for large cracks?
For big or structural cracks, it’s a good idea to hire a professional. They can check the problem and do the needed repairs. This helps keep your home safe and stable.
See Also
Essential Tips for Effective Concrete Crack Repair Solutions
Comprehensive Strategies for Successful Concrete Crack Patching
The Definitive Handbook for Durable Cement Crack Sealing