Have you ever gone outside and seen cracks in your driveway or patio? These small problems can quickly become bigger ones if you don’t address them with concrete repair right away. Ignoring concrete damage can lead to expensive repairs later. Fortunately, you can handle these concrete repairs yourself. This will save you both time and money. Products like Rapidset Cementall make it easy to fix cracks and holes fast.
Key Takeaways
Find out what kind of concrete damage you have. Spotting cracks, holes, or flaking helps you pick the best repair method.
Use the right tools for fixing concrete. Important tools like a caulk gun, trowel, and pressure washer make the work easier and better.
Get the area ready before you start repairs. Cleaning the surface and wetting old concrete helps new materials stick better.
Follow the mixing and application steps closely. Mixing and applying correctly makes repairs stronger and last longer.
Fix small concrete problems quickly. Fast repairs can stop expensive damage and save you money later.
Types of Concrete Damage
Concrete surfaces can get damaged in different ways. Knowing these problems is the first step to fixing them. Let’s look at the most common types of concrete damage you might see.
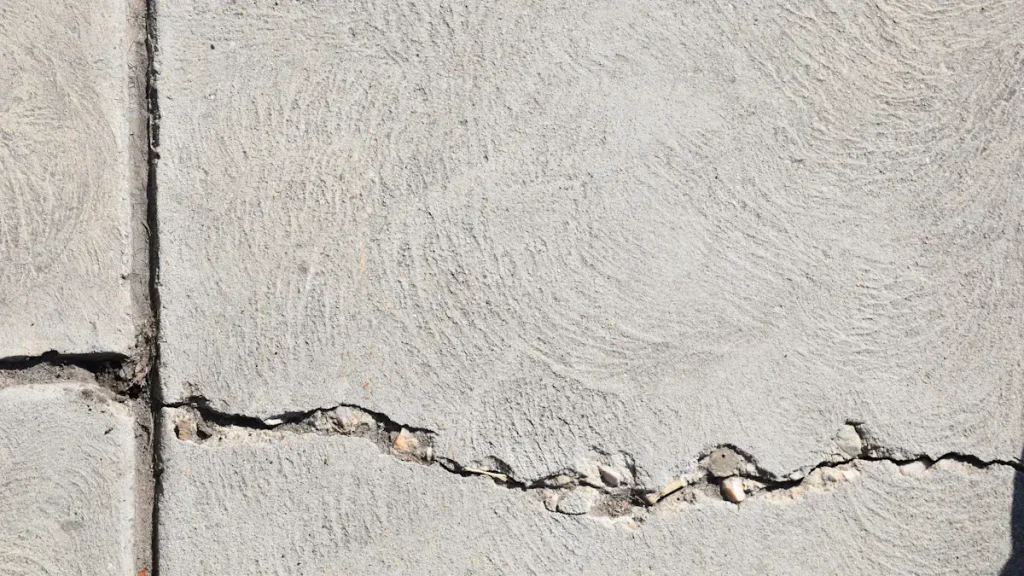
Cracks
Cracks are a common issue for homeowners. They can happen for many reasons, such as:
Cause | Description |
|---|---|
Shrinkage During Curing | Concrete shrinks as it hardens. Fast or uneven drying can cause tiny cracks. |
Soil Settlement or Shifting | Bad compaction or erosion can make concrete sink or shift, causing cracks. |
Water can get into cracks, freeze, and expand, making them worse, especially outside. | |
Excess Load or Overloading | Putting too much weight on concrete can cause cracks or breaks due to stress. |
Poor Construction Practices | Bad installation can lead to cracks, like not placing control joints correctly. |
It’s important to know what type of crack you have. Some cracks are just on the surface, while others might show deeper problems. Fixing them quickly can stop more damage and save money.
Pits and Holes
Pits and holes can form on concrete surfaces for different reasons. Weather changes, like freeze-thaw cycles, can let water seep into concrete, freeze, and expand, causing damage. Also, chemicals from deicing salts can weaken the surface. Bad installation, like not curing properly or mixing wrong, can also cause this damage.
When you see pits or holes, act fast. Fixing thin concrete damage helps restore the surface and stops water from getting in, which can cause bigger problems later.
Surface Spalling
Surface spalling happens when the top layer of concrete chips or flakes off. This damage usually comes from:
Freeze-Thaw Cycles: Water gets into cracks, freezes, expands, and creates pressure that breaks the surface.
Deicing Chemicals: These make concrete absorb more moisture and can harm it, increasing freeze-thaw stress.
Improper Installation: Concrete that is mixed or worked too much is weaker and can break down.
If you see spalling, it’s important to fix it quickly. If you don’t, spalling can cause more damage and weaken your concrete surfaces.
By knowing these types of concrete damage, you can take the right steps to fix them well. Remember, acting early is key to keeping your concrete surfaces lasting longer.
Tools for Concrete Repair
When you want to fix concrete, having the right tools is very important. Here’s a list of tools you will need for your DIY projects:
Essential Tools
Caulk Gun: This tool helps you put concrete caulk on cracks and gaps.
Pressure Washer: Use this to clean surfaces. A clean area helps sealants stick well.
Angle Grinder: This tool smooths rough edges and gets cracks ready for repair.
Trowel: You need this tool to spread and shape the concrete.
Wheelbarrow: This helps you move concrete and other materials around easily.
Screed Board: Use this to level the concrete surface for a smooth finish.
Using the right tools makes your job easier and improves the quality of your repairs. Good tools last longer and need less maintenance. Plus, tools made for specific jobs help you get a better finish.
Safety Gear
Safety is very important when working with concrete. Here’s a list of safety gear you should wear:
Heavy-duty waterproof gloves: These keep your hands safe from cement burns and cuts.
Slip-resistant boots: Choose boots that keep wet cement out and give good grip.
Safety glasses or goggles: Protect your eyes from splashes and debris while working.
Respirators: These protect you from breathing in harmful concrete dust, especially when grinding.
Long sleeves: Wearing long sleeves helps protect your skin from irritation from concrete.
By wearing the right safety gear, you can avoid common injuries when doing concrete repair. For example, keeping your work area clean and wearing anti-slip shoes can help prevent slips and falls.
Remember, taking time to prepare with the right tools and safety gear will make your concrete repair projects easier and safer!
Steps to Repair Concrete Surfaces
Repairing concrete surfaces might look hard, but you can do it easily! Let’s split it into two main parts: getting the area ready and mixing and applying the repair material.
Prepare the Area
Before you start fixing anything, you must prepare the area well. This step is very important for making sure your repairs last. Here’s how to do it:
Clean the Surface: Scrub off dirt and loose stuff. If needed, use a wire brush for tough grime.
Assess the Damage: Figure out where the pieces fit in the damaged area. This helps you know how to fix it best.
Wet the Existing Concrete: Make sure all old concrete is wet. This helps the new repair concrete stick better.
Proper surface preparation is key for strong adhesion and lasting repairs. It helps create a good surface and removes dirt that could weaken the bond. Good preparation improves both grip and chemical adhesion, which are important for durability.
Mix and Apply Repair Material
After preparing the area, it’s time to mix and apply your repair material. Here’s a step-by-step guide for a smooth and strong finish:
Choose the Right Repair Material: Pick a good product made for your repair needs. Rapid-setting concrete mixes are great for quick fixes.
Mix the Repair Material: Follow the instructions carefully. Make sure you have a smooth mixture without lumps.
Apply the Repair Material:
Start by putting the mixed material on the damaged area. Use a trowel to spread it evenly.
Fill all cracks and holes completely.
For a smooth finish, use a screed board to level the surface.
Before putting on patching material, make sure the old concrete is in a Saturated Surface Dry (SSD) state. This stops the old concrete from pulling water out of the repair material too fast, which can cause problems.
Control Moisture: Manage moisture well to avoid damage to repairs. Using flexible caulk and vapor barrier membranes can help.
Use Bonding Agents: Apply bonding agents to improve adhesion and longevity. This step is very important for making sure your repairs last.
Using rapid-setting concrete mixes can really speed up your project compared to regular mixes. These products dry fast, letting you finish quicker and stop more damage to the old concrete.
By following these steps, you can repair concrete surfaces well and make them last longer. Remember, taking time to prepare and use the right materials will make a big difference in how long your repairs last!
Tips for Effective Concrete Repair
When you repair concrete, mixing and applying the right materials is very important. Here are some tips to help you get the best results.
Mixing Instructions
Mixing your repair material the right way is key. Here are some common mistakes to avoid:
Using the wrong type of material that shrinks when it dries, which can let water in.
Not preparing the surface well before applying, which is very important for a good bond.
Trying to repair with regular mortar or Portland cement, which can let water through because of slight shrinkage.
Always follow the manufacturer’s instructions for mixing and curing times. This will make sure your concrete repair is strong and lasts a long time.
Application Techniques
Applying your repair material correctly is just as important as mixing it. Here are some techniques to remember:
Clean out all dirt from cracks before putting in filler material.
Choose high-quality filler materials made for concrete repair.
For bigger or deeper cracks, think about using epoxy injections or other advanced methods.
When fixing different types of cracks, use the right method:
Dynamic cracks need flexible treatments or strong stitching support.
Static cracks can be filled with semi-rigid materials.
Using bonding agents can also help your repairs. They improve the bond between old and new concrete, reduce shrinkage and cracking, and make it more durable. This is especially important in busy areas.
By following these tips, you can make sure your concrete repairs work well and last a long time. Remember, taking time to mix and apply your materials correctly will save you from problems later!
Fixing concrete problems quickly is very important. Taking care of small issues early can save you a lot of money later. Here are some good reasons to repair on time:
You can stop expensive emergency repairs.
Small fixes need less work and materials.
Checking regularly helps avoid big costs in the future.
So, why not try these tips? You’ll save money and feel good about improving your home. Have you done any concrete repairs yourself? Share your stories or ask questions in the comments below! 🛠️
FAQ
What is the best way to fix small cracks in concrete?
To fix small cracks, first clean the area. Then use a concrete filler or caulk. Apply it with a caulk gun and fill the crack all the way. Smooth it out for a nice finish.
How long does it take for concrete repair to dry?
Drying time can change based on the product. Most rapid-setting concrete mixes dry in about 1 to 3 hours. Always check the instructions from the manufacturer for exact drying times.
Can I paint over repaired concrete?
Yes, you can paint over repaired concrete after it has fully dried. Be sure to use a concrete primer first. This helps the paint stick better and gives a smoother finish.
How do I prevent future concrete damage?
To stop damage, seal your concrete surfaces often. Keep them clean and free of debris. Avoid using strong chemicals that can harm the surface.
Is it safe to repair concrete in cold weather?
Yes, but you should use special cold-weather concrete products. These are made to cure well in lower temperatures. Always follow the manufacturer’s instructions for the best results.
See Also
Essential Tips for Effectively Repairing Concrete Cracks
Top Five Tips for Strengthening Your Concrete Floors
The Definitive Guide to Successfully Patching Concrete Cracks